Showing posts with label bridging. Show all posts

Friday, December 9, 2016

Craft: Photo Letters. Great Gifts.

To celebrate Christmas with a good friend, we will meet for pancakes as is our annual tradition.  Though we don't typically exchange gifts, I wanted to show my appreciation for her support this year. Earlier this spring, I made writing a priority, and my friend has encouraged me along the way.  I came across a variety of photo letters on Pinterest, and I thought this would be the perfect accessory for her office.  There are numerous tutorials available online.  I'm not trying to recreate the wheel, but I think this project could be fun for the girls in your troop--as a craft or a gift.

SUPPLIES:
  • paper mache letters ($2.99 at Hobby Lobby)
  • photos*
  • scissors
  • ribbon
  • paint
  • paintbrushes
  • Mod Podge
  • hot glue gun or tacky glue (ribbon)
*Making multiple letters?  Can the same pictures be used?  Save money by printing wallet-sized photos.  Not only will a greater portion of the image fit on the letter, but you get two prints of the picture with your order.
*The number of photos needed depends on the images.  Eight photos fit on the S.

GREAT HOLIDAY OR END-OF-YEAR GIFTS FOR:
Girl Scout Troop Leaders
Girl Scouts*
Teachers
Coaches
Sunday School Teachers

*GIRL SCOUTS
  • Incorporate this project into your Christmas or Winter party. You may need a few extra adult volunteers to help with tracing and piecing the pictures together, but I would have tried this project with our girls when they were Juniors.
  • Choose pictures of troop activities and this would make a cute bridging gift.

Thursday, November 10, 2016

Blackout Poetry

Last month, my 11-year-old daughter and I attended Books by the Banks in Cincinnati. While she was preoccupied with alcohol-inked ceramic tiles and activities that taught her how to solder and create a paper circuit with copper tape and a LED diode, my eye was drawn to the Blackout Poetry station at the end of the table. For more details about the time we spent at this event, please visit this post I've published on my website.

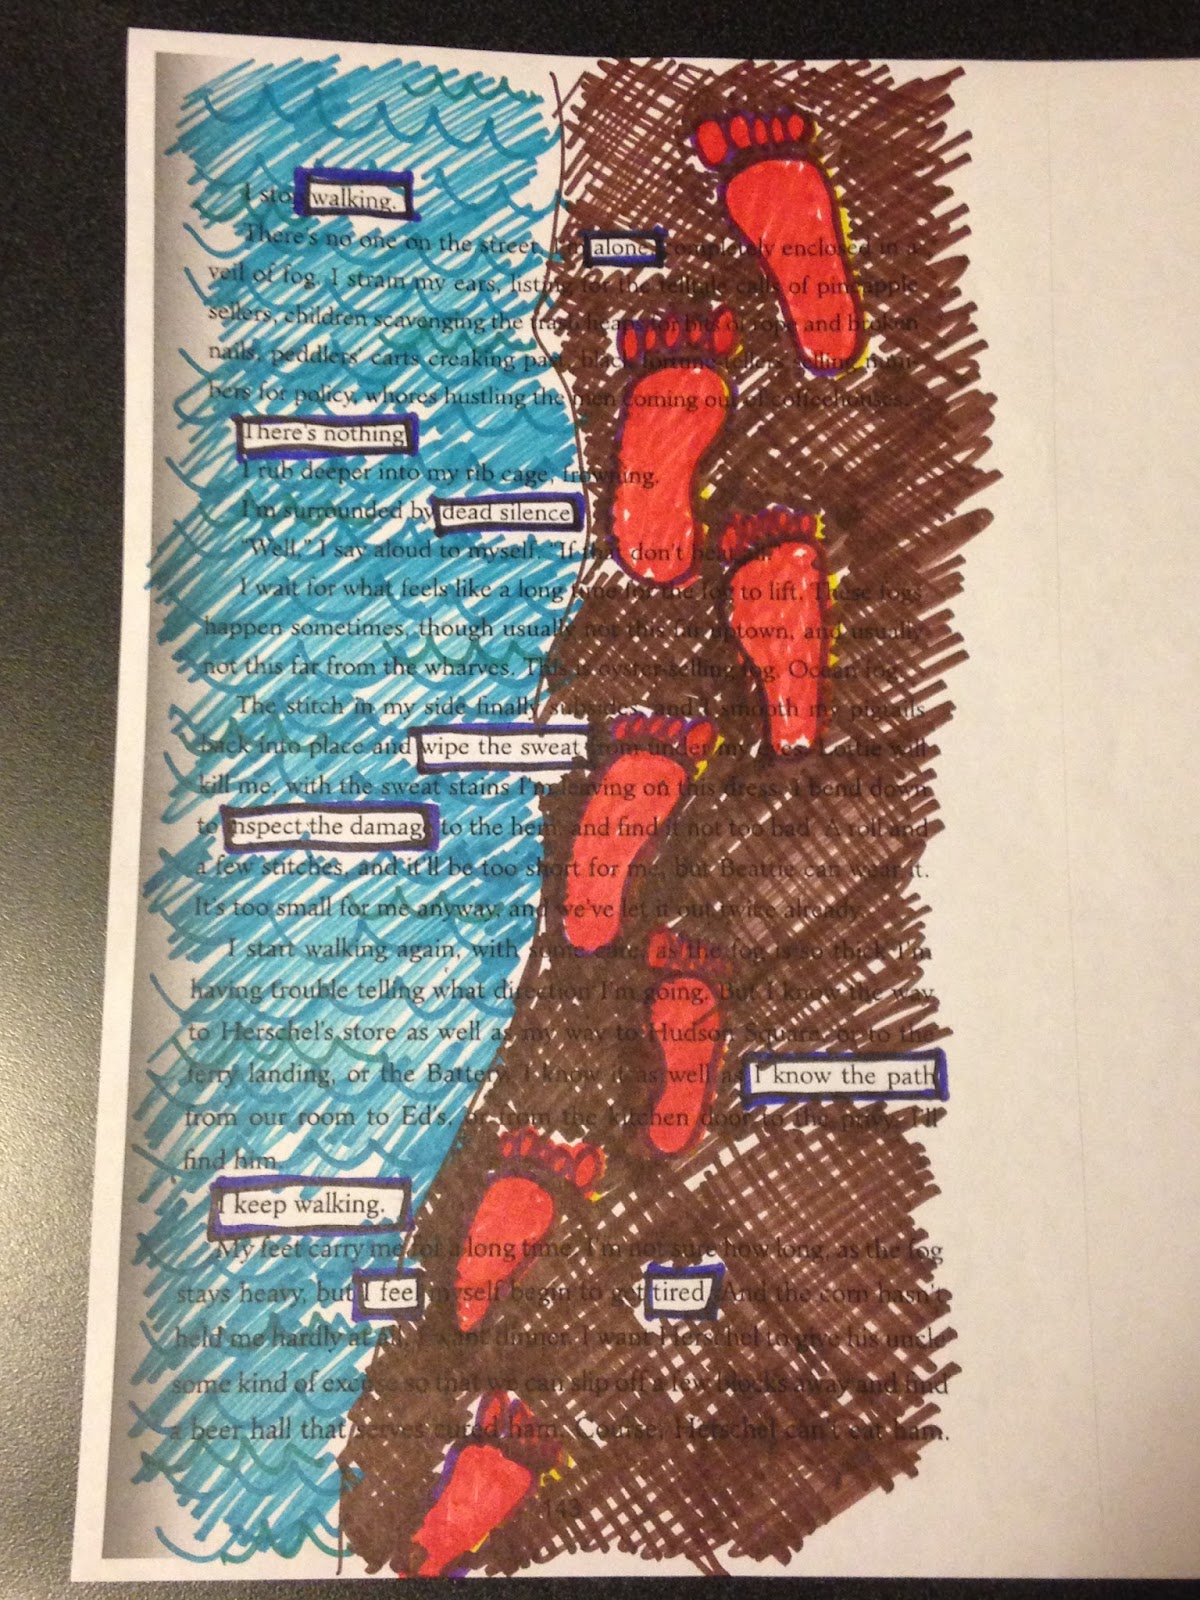
A few days after the event, I decided I wanted to create my own example of Blackout Poetry for this post. I pulled out the pages provided at the event and read over the text, drawing boxes around words to form a poem.  I illustrated my poem with Sharpie markers. Instead of drawing footprints on a beach, I could have chosen to sketch a pattern or design.


The words I chose to highlight read as follows:

walking
alone
There’s nothing.
dead silence
wipe the sweat
inspect the damage
I know the path
I keep walking.
I feel…tired.

Any sheet of paper with printed words will work for this activity–consider pages from a book, newspaper, or magazine. Try different mediums to achieve the desired effect–crayons, markers, colored pencils, or paint. With Blackout Poetry, the possibilities are endless.


How can you incorporate this activity with your Girl Scout troop?
  • Provide supplies at the next troop holiday party. The printed pages can be related to the party theme.
  • Print pages about Juliette Gordon Low for a JGL or Girl Scout Birthday celebration.
  • Copy a page from The Brownie Story (The Girl's Guide to Girl Scouting or a related website).
  • Before or after your troop bridges, find a page from a ceremony script or a related story.
  • For Juniors working on the Scribe badge, this activity satisfies Step 1 (Start with a Poem).
  • For Juniors working on the Drawing badge, this activity satisfies Step 1 (Experiment with Different Shading Materials). In fact, depending on what is drawn, girls could satisfy all the steps with this activity.
  • Plan some time for Blackout Poetry during a Self-Esteem Workshop. This activity offers girls a different avenue for expression, and it's another way to emphasize how special and unique each individual is.
I've presented several ways to introduce Blackout Poetry to the girls in your troop. I'm sure readers will come up with other applications. Please feel free to post your art in the comments section below. I'd love to see it!  Thank you for reading.

Tuesday, May 24, 2016

Girl Scout Bridging Event

This spring, our combined troop of Brownies and Juniors were ready to bridge to the next level of Girl Scouts.  When talking with the girls about the occasion, they made it clear they did not want to have a ceremony, nor did they wish to invite family members to attend our event.  But they did love the idea of doing something special.  We agreed to schedule an evening trip downtown (Cincinnati).  The girls wanted to cross the Ohio River on the Suspension Bridge before celebrating the occasion with a sweet treat from Coldstone Creamery in Newport, Kentucky.


Since we had already scheduled an evening service project at the Fisher House in April, we agreed we could extend the evening and head downtown after cleaning up the planting project. 

After reviewing the budget, we leaders knew we had enough money in the troop account to allow the girls to order a small ice cream with the one complimentary topping of their choice ($4.54)Troop funds also covered the cost to park in the garage adjacent to Newport on the Levee ($2/car on this specific evening).
  
When we reviewed our expenses for the year, we realized we had some money remaining from our Bake Sale in the fall.  That money had had been promised to the men and women who have served our country.  Our girls voted with their families, and we decided all remaining troop funds be donated to the Bake Me Back Home project with Bake Me HomeOur donation will deliver a jar of cookie mix and 48 baked cookies to the Fisher House every week for one month.  


Seems like it was yesterday when they were Daisies.  Please check back soon.  I will share our plans for the future in my next post.

Monday, March 14, 2016

Craft: Mini Canvas

This winter I've been helping my husband coach our daughter's basketball team.  The season is winding down, and I wanted to give each of the girls a small token so they could remember their time with the team.  In this post, I will share how I personalized these cute mini canvases for the girls on the basketball team.  The total cost was less than $1.75 for each gift, including the gift bag.  Our Girl Scout Troop will be bridging this spring, so I've also been brainstorming gift ideas for them.  With a few modifications, you can personalize Bridging gifts without breaking the bank.  

This four-pack of 3" mini canvases was found at Hobby Lobby for $4.99.  Using a 40% off coupon, the package can be purchased for $2.99 plus tax.

I picked up the paint for $0.50 a bottle at Walmart.
I also bought the Sharpies at Walmart, but they can be purchased at Dollar Tree as well.


Paint the front and edges of the canvas your desired colorPurple and white are the colors of our basketball teamIt took three coats of paint to cover the canvas completely.


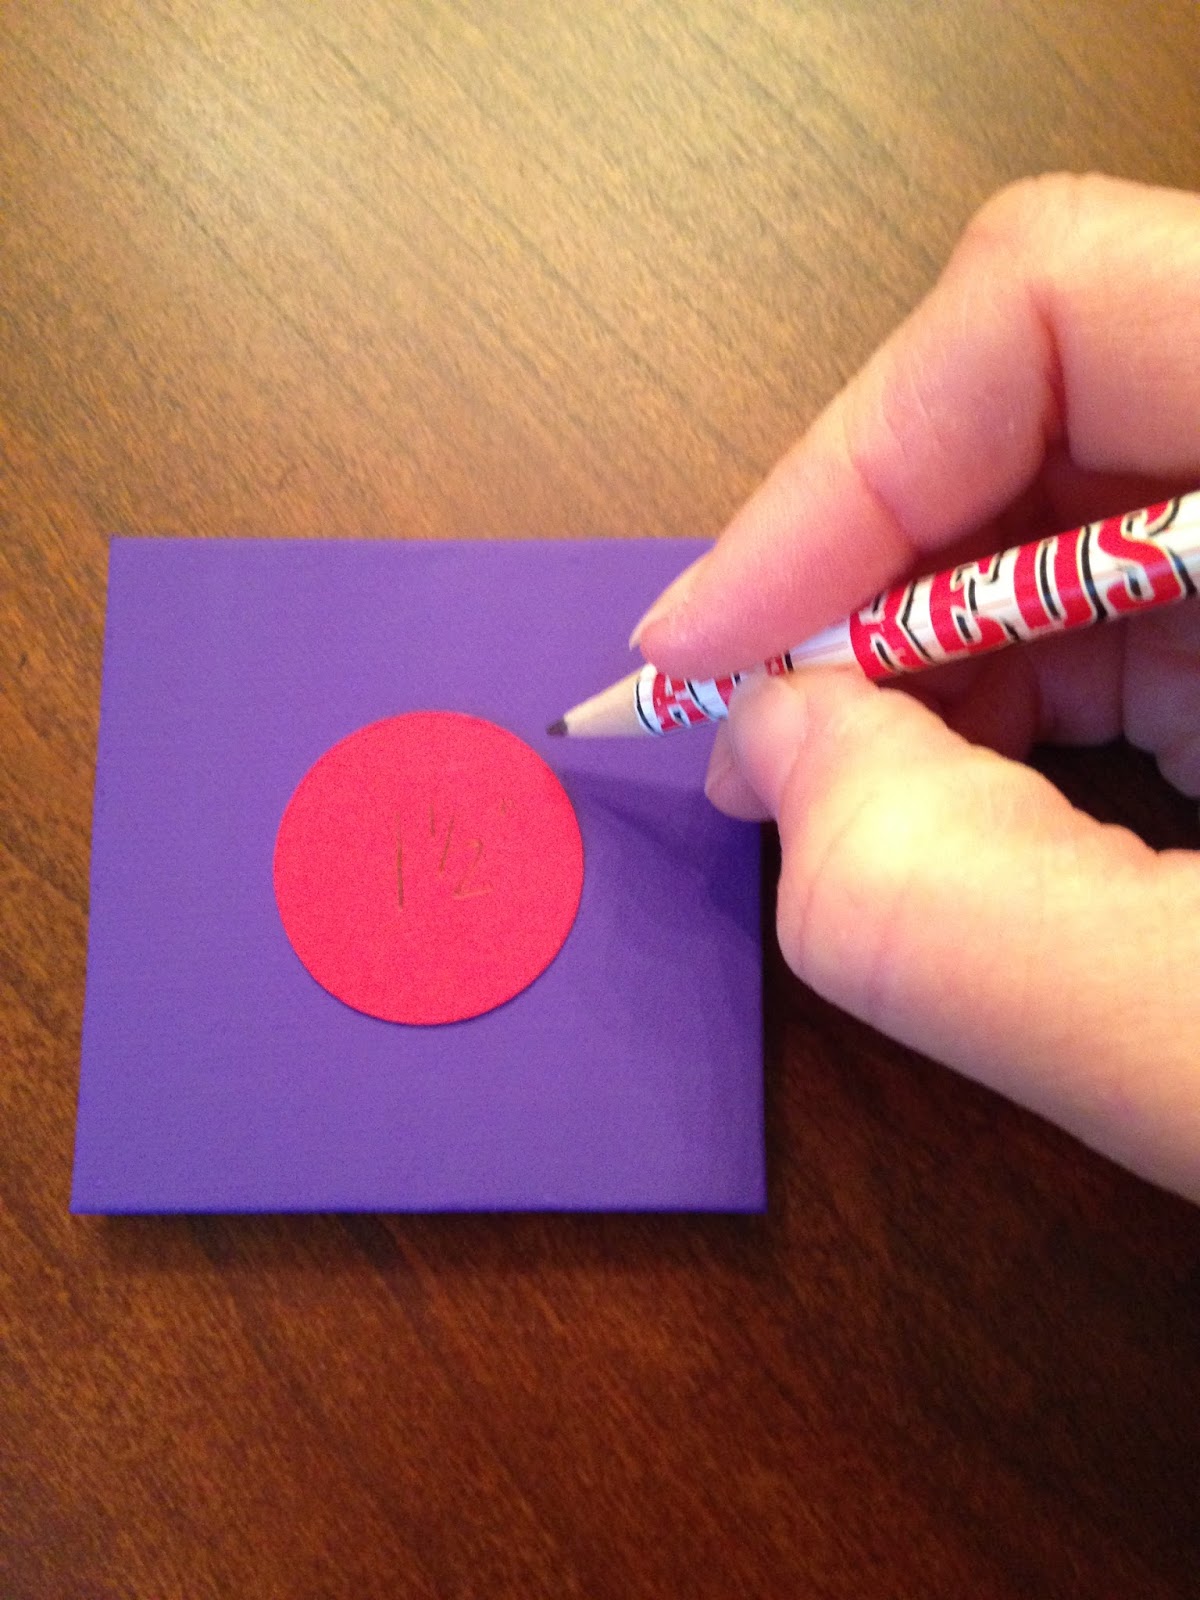
Cut a 1.5 inch circle out of cardstock.

Using this cardstock template, trace a basketball in the center of each canvas.


It took six coats of orange paint to cover the circle for the basketball.

Using a Sharpie, outline the circle and add lines on the basketball.  


Write the player's name, number, and team name on the canvas.

Of course, a thin paintbrush and black paint or a paint pen would work as wellI'm just partial to the permanent marker.


Apply a thin coat of Mod Podge on the front and edges of the canvas and let it dry.

Borrowing parachute cord that remained from our Girl Scout Troop's macrame bracelet project, I snipped three-inch segments of purple cord. 

Using a glue gun, adhere the ends of the cord or ribbon in the center of the top edge of the canvas to make a loop.


I decorated white gift bags I purchased at Dollar Tree (3 bags for $1) by cutting 2" orange circles out of cardstock.  I added lines to the basketballs and adhered them to the bags with a glue stick.  Each player's name was written on a bag beneath the basketball.  I used tissue paper and white curling ribbon I had on hand to finish the bag.  My husband will write a note to each player, and we'll stick the card in the bag before heading off to the Awards Ceremony.
 

For Girl Scouts:
  • Cut out a trefoil template.  I found this trefoil on the cover of a Girl Scout Volunteer Opportunities booklet.  It was the perfect size for this mini canvas.    
  • Paint the trefoil green.  
  • Outline the trefoil with a black Sharpie.  
  • Add a girl's name and your troop number to the canvas.  Or write the words "Courage, Confidence, and Character."
  • Use a glue gun to adhere ribbon to the back of the canvas.
  • Place in a personalized gift bag.  I used this same template to cut trefoils out of green cardstock.  I glued the trefoils to the gift bags and added tissue paper and white curling ribbon as was done for the basketball gifts.

Don't have an athlete or a Scout?  These mini canvases would make adorable birthday party favors.  I picture a personalized cupcake on a mini canvas for the guests.  I can see this working well for a beach-themed party:  flip flops, bucket, sand castle.  A zoo or farm-themed party:  faces of pigs, cows, and horses.  A tea party: tea cup, flower...the options here are endless!  Depending on the ages of the guests, it might be fun to have the kids paint a canvas during the party.

Instead of making this gift for our Bridging Girl Scouts this year, I decided to melt crayons on a canvas for each of the girls in our troop.  I will share the process and the finished product in a future post.  I hope you check back soon!  Thank you for reading. 

Monday, February 22, 2016

Craft: Melted Crayon Art, Bridging Gifts

This spring, our Brownies will bridge to Junior Girl Scouts, and our Juniors will bridge to Cadettes.  The girls voted not to include a ceremony or skit in the celebration, and they did not want to invite their families to join us.  But we are doing something special to mark the occasion--I don't want to announce our plans just yet.  In the past, I have put together small Bridging gifts for our girls to mark our time together.  When our Daisies bridged to Brownies, I gave them a wooden plaque.  When the Brownies bridged to Juniors, I decorated and filled a Fry Box for the occasion.  With our Bridging event scheduled this month, I spent some time brainstorming and remembered a melted crayon art project I made last yearFinding this project to be quick and easy, I thought I'd share my method here.


This 3-pack of canvas panels can be found at Walmart for $2.77.  Over the years, I have accumulated many supplies and I often struggle to close my craft closet door.  This project requires crayons and a heat gun. Since these items are stored in said closet, I only had to purchase the canvas panels.  This craft cost less than $1.50 each, including the personalized gift bag.


Lightly sketch the initial in the bottom right corner of the canvas.  The use of a stencil or a Cricut may be helpful for those who may not wish to freehand.


Paint the letter.  I applied three coats to achieve the desired coverage.  Outline the letter with a black Sharpie.  Of course, a paint pen or brush and paint would work as well.  I prefer to use a permanent marker.
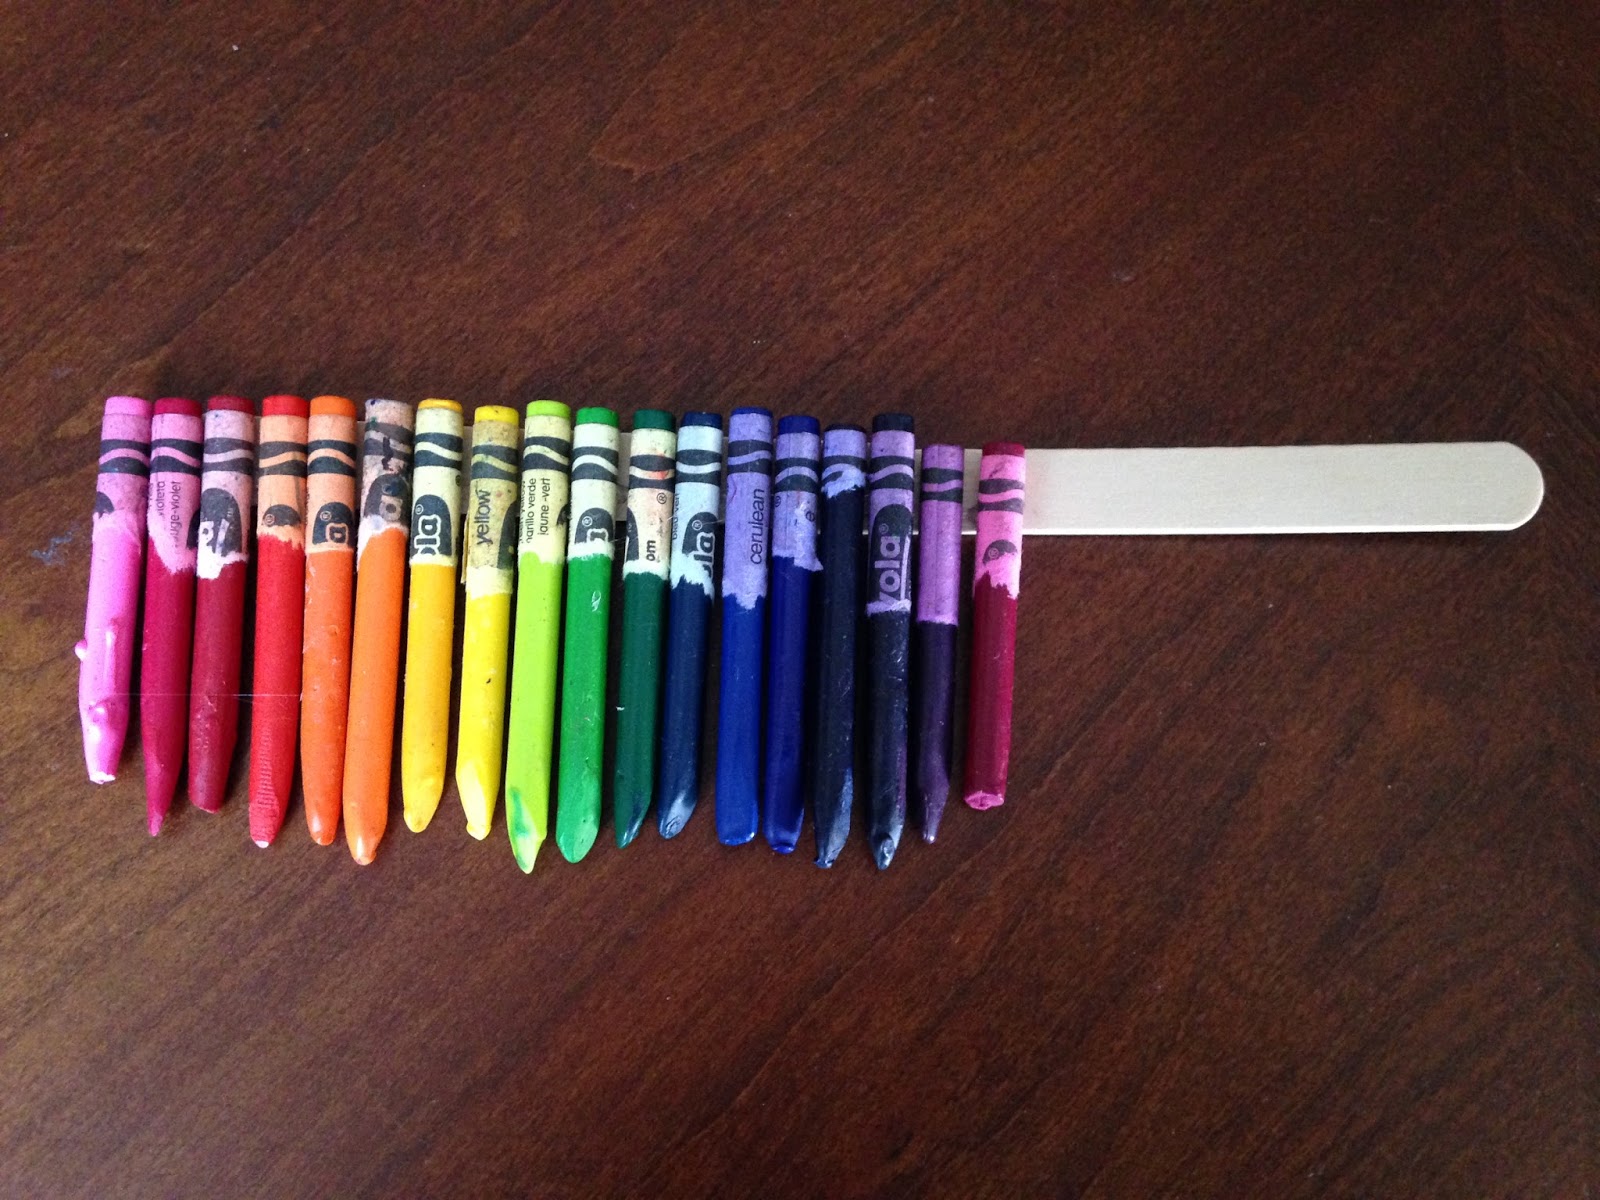
Choose the crayons you wish to use and arrange them as you so desire.  I found some six-inch tongue depressors in the craft closet.  Using a hot glue gun, I glued a 1/2" tip of one tongue depressor to the end of the other.  Glue the crayons to the wood.  Having this handle allowed me to hold the crayons easily while reducing the risk of burning my hand.


Cover your work area.  Apply painter's tape to protect the painted initial.  Prop the canvas up so the melted wax will drip.  Try not to allow the wax to flow onto the painter's tape by tipping the canvas horizontally.  My daughters helped with this part of the project.

NOTE:  The "e" canvas was created using the steps detailed above.  For the "B" canvas, I still covered the lower right hand corner with painter's tape, but I melted the crayons before painting the letter in the available space.  I think this latter method created a better finished product.  Please note I share two of the best panels here.

Using a black Sharpie, I wrote "Your true colors are beautiful like a rainbow" on the back of each canvas.  Below the quote I listed our troop number and the year.


I popped the canvas into a personalized gift bag.  My husband has coached our daughters' t-ball, softball, and basketball teams.  At the end of the season, he writes an encouraging note to each of his players.  Following his lead, I will write a note to each girl and slide it into the bag before heading out to our Bridging event.  I hope you'll check back with us soon.  Thank you for reading!

Wednesday, September 23, 2015

The Plan for 2015-2016

At the end of the 2014-2015 school year, the girls in our troop participated in Early Bird RegistrationI was really excited that all of our girls wanted to return for another year of Girl Scouts--our sixth year together!  We also welcomed two new girls into our blended troop, giving us six Juniors and five Brownies this year. 

As usual, we took a break from troop meetings and activities over the summer.  Three of the girls from our troop attended a Girl Scout Summer Resident Camp together.  Despite some strong storms, it sounds like they had a blast during their week at camp!

As families geared up for the return to school, I touched base with troop members.  I learned a lot had changed for some of our girls between June and August.  One family moved to a nearby town, another girl was losing interest in Girl Scouts, and many of the girls planned to participate in other extracurricular activities which placed a greater demand on their time.  Some changes needed to be made to retain our membership.  Instead of meeting twice a month as we have in the past, we are going to have one activity a month this year.  Most of these activities are going to be outings or events.  After sharing this new plan with the families, they all agreed to continue.  I'm so happy we will not be losing any of our girls this year.  

Here is a snapshot of our calendar:
  • Bake Sale at our school's Open House
  • S'mores Fest
  • Tour at Neusole Glassworks
  • Home Scientist and Inventor Badge programs for the Brownies at Drake Planetarium
  • Drawing Badge for the Juniors with Young Rembrandts
  • Family Story Badge and Art Show
  • Service Project:  Make cards and fill mason jars with candy and paper flowers for Veterans and their families at the Fisher House
  • Gardener Badge for Juniors at Civic Garden Center
  • Geology Program at the Cincinnati Nature Center
  • Service Project:  Plant garden at Fisher House
  • Bridging Ceremony 
My blog posts will consist of reviews of the programs and events we attend this year.  I think we're going to have a lot of fun!  Hope you check back with us soon.

Tuesday, August 4, 2015

Bridging Ceremony Invitation

Since our troop does not meet during the summer, I decided to branch off a little and share some of the birthday invitations I have made for my daughters over the years.  The invitations featured in Birthday Party Invitations:  Part One, Part Two, and Part Three were easy to make just by using circles (and ovals) and a little imagination.  

The girls in our Girl Scout troop have made invitations during our meetings on several occasions like our Thinking Day Tea, our Mother's Day Tea, and our Bridging to Juniors Ceremony and our Bridging to Brownies Ceremony.  On several occasions, we have given them cardstock, markers, and the freedom to create their own invitations.  When the girls were Daisies, I printed the event details on cardstock and cut them so the girls could glue the cardstock to the back of the invitation.  Once they bridged to Brownies, I started printing the specifics on a sheet of paper.  I thought the invitation with handwritten details would be a cute keepsake.

In this post, I will describe how to make this rainbow invitation that could be replicated for your next troop event. 

RAINBOW BRIDGING INVITATION  

Inspiration provided by this pin.  I made this invitation for our girls to give to their families when they were bridging from Brownies to Junior Girl Scouts. I also talk about this invitation in this post about planning and preparing for our Bridging Ceremony.  The Girl Scout Bridging Arcs resemble a rainbow, in fact the Bridge to Brownie Award used to be a rainbow.  What an easy theme for an event!

Directions:
1.  Cut light blue cardstock into 5 1/4" x 3 1/2" rectangles.
2.  Using a pencil, lightly draw a fluffy cloud shape on white cardstock.  This cloud happens to be 4 1/2" x 3" at it's highest points.  If you have a Cricut Personal Electronic Cutting Machine, you may wish to use the Cricut Create a Critter Cartridge to cut the cloud shapes.  
3.  Cut red, orange, yellow, green, blue, and purple ribbon into 4" pieces.
4.  Tie colored pony beads to one end of each ribbon.  
5.  I used a 1/4" rectangle hand punch to cut holes about 1" from the bottom of the cloud's edge, spacing the holes about 1/2" apart.
6.  Arranging the ribbon in rainbow-colored order, thread each ribbon through one hole and adhere to the back of the cloud.  I used a glue stick.
7.  Glue the cloud to the blue cardstock.
8.  Handwrite or print party details on another piece of cardstock and adhere to the back of the invitation.

I had the ribbon remaining from our Girl Scout ribbon Law flip flops project, and the beads were left over from various projects like beaded Christmas ornaments.  Therefore the cost to make this invitation was minimal.

I invite you to check back as our Junior Girl Scouts will be making invitations later this year to satisfy a badge requirement for the Social Butterfly badge.  Thank you for reading!

Wednesday, April 29, 2015

Craft: More Gift Ideas for Teachers and Leaders

In my last post, I shared the gifts our family has given to our daughters' teachers at the end of the school year.  Our family also gives teachers homemade gifts for Christmas.  These ideas would make great end-of-the-year gifts as well.

CHIPBOARD ALBUMS, SCRAPBOOKS, AND RECIPE BOOKS


Many years ago I purchased several chipboard books from the dollar bin at Michaels.  Each year for Christmas, my younger daughter helps choose the paper that covers both sides of the chipboard pages.  Scrapbooking is a hobby of mine, so I have a supply of patterned paper to use.  Additionally, we bought a pack of coordinating Christmas paper specifically for these chipboard projects, and we've been using this paper for the past couple of years.  In this case, buying the paper pack proved to be more economical for us than to buy individual sheets of paper.  For these projects, I tend to prefer the kits that include coordinating paper and stickers like the Bella Blvd Christmas Cheer Scrapbook Collection Kit or the
Carta Bella Paper Company "All Bundled Up" Collection Kit.  


Since there are five pages, there are ten sides to cover with paper.  This means we need to trace and cut ten different sheets of paper.  My daughter decides which papers to use before tracing the chipboard page on the paper.  I cut around the scalloped edge and divide the circle.  The photo above shows the paper has been cut in half.  Usually I start to the right of the scallop with the ring and cut straight down as I have shown with the white dotted line in the picture below. 


My daughter lays the papers out on the table, arranging them as she would like them to appear in the book.  She uses a glue stick to adhere the paper to the chipboard.  I cut thin strips of coordinating paper or cardstock to cover the seam where the papers meet.  Occasionally she uses a wallet-sized photo as a template and cuts a photo mat to add to each page.  Since the paper kit we bought included matching stickers, my daughter is free to embellish the pages as she wishes. I do not have a picture of the Christmas chipboard albums, but I have included a couple pictures below of a project we did together as another example.


In that same dollar bin at Michaels, I found some 6x6 scrapbook albums.  My older daughter likes to help me with scrapbook pages, and she enjoys creating a scrapbook for her teacher for Christmas.  Due to time constraints and to keep the cost of the project manageable, I encourage her to keep the pages simple.  She may add a strip of patterned paper, a photo mat, or a decorative triangle to the corner of the page.  While we have purchased a package of coordinating paper that she uses specifically for these gifts, she is able to use some of the scrap paper I have remaining from album pages I've already finished.  For the past couple of years she has written her favorite recipes on recipe cards and adheres them to the pages, including photo mats on the other pages.  The teachers can either add photos or recipes of their own.  

Just like the end-of-the-year gifts, these presents can be modified for other special adults in your child's life (like coaches, band directors, and Girl Scout troop leaders).  On that same note, these small books could be given to the girls in a troop in honor of a special occasion (like Bridging).  They could be made for the players on a sports team, or the cast of the school play, or Sunday School volunteers.  In my experience, these books are treasured keepsakes--for those receiving the gift as well as for those giving it.  Thank you for reading!

Monday, June 30, 2014

Bridging to Juniors: The Ceremony

Our Brownie troop bridged to Juniors in late May.  We devoted two meetings just to plan and prepare for this special ceremony, and their participation in this process satisfied the 5th step for the Celebrating Community badge.  In the previous post I provided details about our decorations, but I thought I would include some of the photos here, too.

OUR BRIDGING CEREMONY 
Welcome:  I began the event by welcoming our guests.  I also gave a brief overview of our year for the extended family members in the audience who may not have been familiar with our troop's activities and accomplishments.
Promise:  One of our girls led the troop in reciting the Girl Scout Promise. 
Pledge:  We had placed a flag in the corner of the ampitheater prior to the start of the event.  Another girl invited our guests to stand and join us in saying the Pledge of Allegiance.
Skit:  Two girls introduced our skit, politely requesting our guests not use flash photography (their idea).  This was adorable and got a few laughs.  The skit was written by the girls in the troop.  They brainstormed general ideas, agreed on one, and worked together to write the lines.  We leaders helped ensure the speaking parts were equally distributed.  In the skit, the girls helped a "younger girl" learn about Girl Scouts.  They incorporated the Girl Scout Law, the song "Make New Friends," and the Friendship Squeeze into the skit.  Super cute!

              
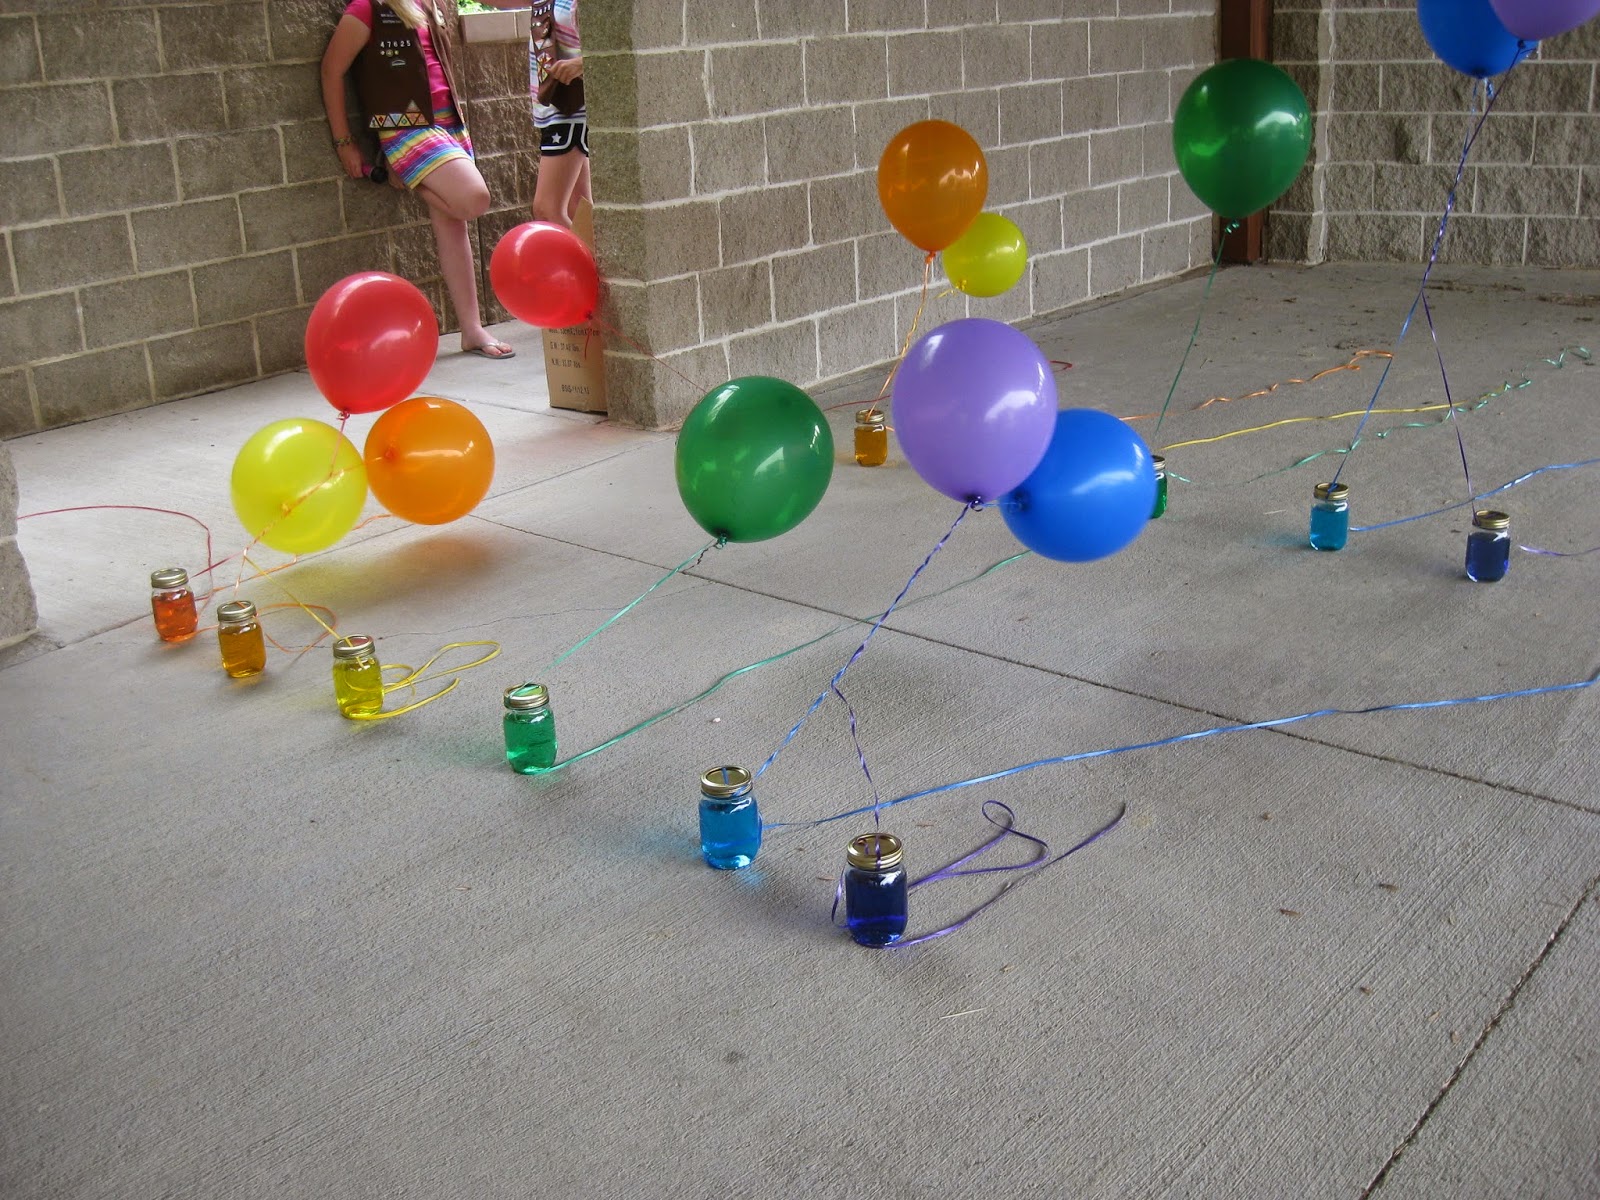
Introduction of Girls:  Prior to the ceremony, we filled mason jars with water and added a couple of drops of food coloring to each jar.  Just before the ceremony, we tied a balloon to each mason jar.  We lined them up in two rows, making the "bridge."  When the skit was finished, we announced the name of each girl and let her walk through the balloon bridge.  Once all the girls were lined up across the front of our stage area, we leaders said something special about each girl.  We chose to hand out the bridging gifts at the end of the ceremony, but we took time at this point in the ceremony to explain what each girl would be receiving in her gift box.

Balloon Ascension:  When they were planning the ceremony, one of the girls asked if they could each have a balloon from the balloon bridge to release at the end of the event to symbolize their graduation to Juniors.  We all thought this was a great idea, and we agreed the girls should end their ceremony this way. 
Kona Ice Snow Cones!The girls decided to have Kona Ice serve snow cones to the troop and their siblings after the ceremony.  This was a great way to end another great year!
The girls are going to work on the Junior aMUSE Journey in September.  This will be our first Journey, so I will be sure to post what worked and what, if anything, we would do differently.  The girls hope to work on their Bronze award next year and have also voted to earn the Camper, Detective, Jeweler, and Simple Meals badges.  We hope you will check back in with us.  Thank you for reading!

Friday, April 25, 2014

Prep and Planning: Bridging to Juniors

Since I was a little kid, I have loved to watch Christmas specials on television.  When I became a parent, I introduced our girls to my beloved Rudolph and Frosty.  About five years ago, Disney's Prep and Landing aired. This show features "a high-tech team of elves from an elite unit known as Prep and Landing (who) ensures homes around the world are prepared for Santa's visit."  It immediately became my favorite Christmas special.  I was most impressed with their attention to every detail.  This was my kind of team!  I enjoy taking time to plan celebrations for family and friends, vacations, and Girl Scout meetings and events.  

This spring, our Brownie troop is bridging to Juniors.  As I mentioned in a previous post, the girls satisfied Step 5 for the Celebrating Community badge by planning their own Bridging Ceremony.  We held a planning meeting in April, presenting ideas, discussing the possibilities, and casting votes.  We had another meeting to prepare for the event.  In this post, I will describe their process.

We began the planning meeting by reviewing our troop budget.  I shared our account balance with the girls, and then we added the profits from our cookie sale.  We talked about the outstanding expenses we have for the rest of the year.  We considered how to spend the balance, and budgeting for the Bridging Ceremony was part of this quick discussion.  Once we knew how much money we wanted to allot for this celebration, we worked through the 5 W's together: 


What/Why are we celebrating?  We want to recognize their accomplishments as Brownies and celebrate their graduation to the next level of Girl Scouts.
Who did they want to invite to the Bridging Ceremony?  They decided we needed to know how much space was available.
Where should we hold the celebration?  Options to consider included my house, a nearby park, and our Civic Center.
When?  We had previously determined the date and time.  This information helped answer the other questions.
How?  I presented some possibilities to the group such as:  reciting the Girl Scout Promise and Girl Scout Law, saying the Pledge of Allegiance, singing a song, reading a poem, performing a skit, sharing a meal or dessert together.  They also shared their ideas.  Prior to the meeting, I created a Rainbow Party Pinterest Board to provide visuals for various decorations for the girls.

By the end of the planning meeting, we knew our ceremony would be held at our Civic Center Ampitheater.  There would be enough space to invite parents, siblings, and other special family members.  The girls had amazing ideas for invitations.  Due to time constraints, I made invitations for them.  I was inspired by this invitation on Pinterest.  I was able to use supplies I already had on hand, so I avoided spending any money.  The event details are printed on the back of the card.


The girls unanimously agreed Kona Ice would provide snow cones for our troop and their siblings.  (Please note that our Township will not permit sales to occur on the Civic Center premises.  Our troop will pay for the snow cones in advance.  Kona Ice will arrive at our event to serve the predetermined number of snow cones).  

The girls decided they would use balloons to create a bridge.  They would make tissue paper flower decorations.  For the prep meeting, I purchased tissue paper at Dollar Tree (25 sheets for $1.  Each package included 5 sheets each of red, yellow, green, blue, and pink).  Four packages of tissue paper made 10 beautiful flowers.  


The girls would include the Girl Scout Promise and Law, and the Pledge of Allegiance in the Ceremony.  The other leader and I were surprised when the girls exclaimed they would write and perform their own skit.  We devoted a great deal of time during our prep meeting for them to write and practice their skit.


In this previous post, I described how I decorated gift boxes that we will present to the girls in our troop at the Bridging Ceremony.  We have invited three of the younger sisters to join us during the ceremony.  They are Daisies bridging to Brownies, but they will not be bridging with another troop.  I have prepared these boxes for them.  They will receive a packet of Daisy seeds, a homemade brownie, and their Bridge to Brownie Arc in this box.


The Bridging Ceremony is scheduled in late May.  I will be sure to post our ceremony agenda along with details of the skit and some pictures, so please check back.  Thanks for reading.

Thursday, April 17, 2014

Brownie Badge: Celebrating Community

"The Girl's Guide to Girl Scouting features seven Legacy badges that build on 100+ years of Girl Scout history. Each of these badges (Artist, Athlete, Citizen, Cook, First Aid, Girl Scout Way, and Naturalist), is available at five levels of Girl Scouting, from Brownie to Ambassador. In addition, the Girl's Guides include lots of details on Girl Scout traditions and history."  The Celebrating Community badge is the Citizen Legacy badge for Brownies.  In this post, I will describe what our troop did to fulfill each of the five steps to earn this badge.

Step 1:  Explore Community Symbols.  Earlier this fall, we volunteered with an organization called Bake Me Home.  Please check out this link for more information about that project.  Before leaving for the event, we decided to go on a flag hunt.  During our 20 minute drive to the Bake Me Home building, the girls watched for different flags we passed along the way.  The girls in my car spotted 58 flags. The girls in our co-leader's car counted 136 flags!  They saw a cemetery that the girls in my car happened to miss.  It was a fun challenge that fostered some friendly competition while allowing the girls to work together.  

Step 2:  Find three celebration songs.  Our girls and their families went Christmas caroling at a nursing home.  While we walked through the halls spreading holiday cheer, we sang "Frosty," "Rudolph," and We Wish You a Merry Christmas" over and over and over...  We had printed the lyrics for many other songs, but these were the songs the girls knew and enjoyed.  We let them sing those songs repeatedly, and the nursing home residents loved it!  We continued our celebration back at home.  You can read more about our caroling event and Christmas party here.


Step 3:  Follow the parade.  For the past two years, the girls in our troop were invited to march in our high school Homecoming Parade.  Our school district was trying to pass a levy.  The girls made signs supporting the school district and the football team.  This year they marched around the football field. 


Step 4:  Be a landmark detective.  Our troop wanted to earn the Potter badge.  To satisfy one of the steps for this badge, we toured the pottery exhibit at the Cincinnati Art Museum.  The Art Museum was built in 1886.  We asked our tour guide to share three facts about the building with us.  


Step 5:  Join a ceremony or celebration.  I can't believe these girls are getting ready to bridge to Juniors!  I still remember our first Daisy meeting like it was yesterday.  We are in the process of planning the bridging ceremony that will take place in May.  During our last meeting, we discussed who we would invite to the ceremony, where we we hold the celebration, what the girls would do, what we would serve our guests, and how we would decorate the space. At our next meeting, the girls will finish all the preparations for their Bridging Ceremony.  Please check back in late May to read about this celebration. 


Thursday, February 27, 2014

Fry Box Bridging Gift

As I was wandering through the aisles of Hobby Lobby one afternoon, I came across some adorable fry boxes near the gift boxes and bags.  I purchased a package of 10 (with a 40% off coupon, of course).  After the discount, they cost about a quarter a piece.  I planned to hold onto them with the intention of transforming them into cute birthday party favors or holiday gift boxes.  Over the course of this harsh and seemingly endless winter, I have often found myself daydreaming about spring.  This May, our Brownie troop will bridge to Juniors.  When these girls bridged from Daisies to Brownies, I gave them a wooden plaqueAs they fly-up to the next level in Girl Scouting, I want to recognize their accomplishments with a small gift.  I remembered a Bridging gift idea I originally saw on Pinterest (here is a link to the actual blog post).  Today, I will show how I decorated and filled a fry box that I will give to the girls at their Bridging Ceremony in May.


I used a scrap piece of patterned paper to make a template.  Using this template, I would cut the scrapbook paper to cover the fry box.  I played around with the 6"x12" paper, bending and folding it to find the best way to wrap the box.  Then I traced the box and cut out the template.
 

After cutting the template, I made sure the edges of the paper matched the edges of the fry box when wrapped.  I knew I would have to do some trimming around the side edges, but this template would work.  I could cover two fry boxes with one sheet of 12"x12" scrapbook paper.


I bought 12"x12" sheets of green polka dot paper for $0.69 a sheet.  I could have waited for a sale, but I was excited to get started.  I cut the sheets in half.  I turned over one piece of 6"x12" paper and traced and cut out the template.
 

I used an Elmer's glue stick to adhere the paper to the front and back of the fry box.  I folded the paper around the sides like I was wrapping a present and then glued each side edge to the box.
   

Earlier in this post, I mentioned some wooden plaques.  Last year, I made more of these wooden plaques for the girls in my younger daughter's Daisy troop.  I had some ribbon remaining from that craft, and I decided to use it on these fry boxes.  A 10" piece of ribbon wrapped perfectly around the box.
 

I used tacky glue to adhere the ribbon to the box.  I held the ribbon in place for a minute until it dried.  When I cover the rest of the boxes, I will probably use clothespins to secure the ribbon until the glue dries.


I used the Creative Memories Circle Cutter to cut 2" circles out of white cardstock.  I used a gluestick to adhere the circle to the box.  I completed the decoration by placing a sticker on the circle.  I originally purchased these Brownie Girl Scout stickers from Michael's for the girls to decorate their pill bottle first aid kits.  


I adopted Donna's idea and filled the box with a package of Daisy seeds to remind the girls of where they have been.  I added a package of Junior Mints to represent their future in Girl Scouts.  I tucked the Brownie Wings and the Bridge to Brownie Arc in the bottom of the box.  Maybe we will serve brownies at the Bridging Ceremony? 

One of our troop meetings in April will be devoted to planning the Bridging Ceremony.  Not only will the girls be taking ownership of the event, they will be satisfying the 5th step for the Celebrating Community badge.  Please check back--I will share their ideas in a future post.  Thanks for reading!