Showing posts with label Drawing badge. Show all posts

Thursday, November 10, 2016

Blackout Poetry

Last month, my 11-year-old daughter and I attended Books by the Banks in Cincinnati. While she was preoccupied with alcohol-inked ceramic tiles and activities that taught her how to solder and create a paper circuit with copper tape and a LED diode, my eye was drawn to the Blackout Poetry station at the end of the table. For more details about the time we spent at this event, please visit this post I've published on my website.

A few days after the event, I decided I wanted to create my own example of Blackout Poetry for this post. I pulled out the pages provided at the event and read over the text, drawing boxes around words to form a poem.  I illustrated my poem with Sharpie markers. Instead of drawing footprints on a beach, I could have chosen to sketch a pattern or design.
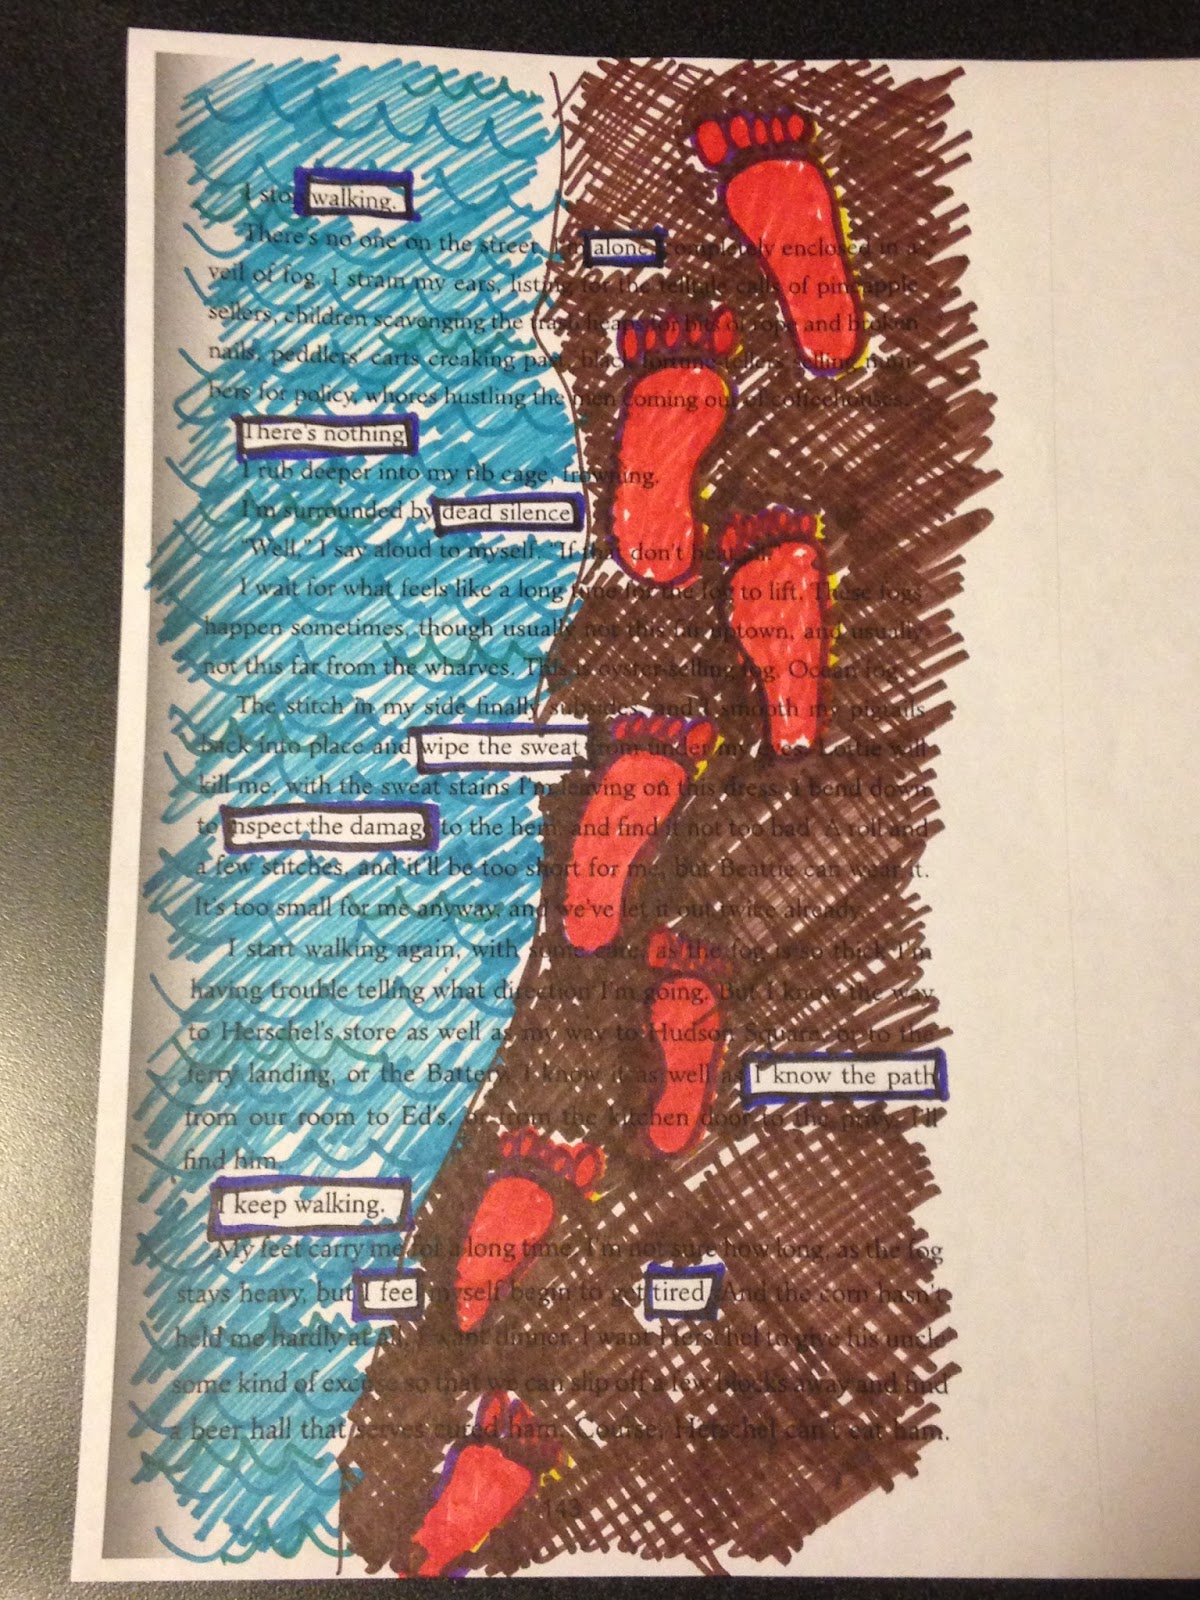

The words I chose to highlight read as follows:

walking
alone
There’s nothing.
dead silence
wipe the sweat
inspect the damage
I know the path
I keep walking.
I feel…tired.

Any sheet of paper with printed words will work for this activity–consider pages from a book, newspaper, or magazine. Try different mediums to achieve the desired effect–crayons, markers, colored pencils, or paint. With Blackout Poetry, the possibilities are endless.


How can you incorporate this activity with your Girl Scout troop?
  • Provide supplies at the next troop holiday party. The printed pages can be related to the party theme.
  • Print pages about Juliette Gordon Low for a JGL or Girl Scout Birthday celebration.
  • Copy a page from The Brownie Story (The Girl's Guide to Girl Scouting or a related website).
  • Before or after your troop bridges, find a page from a ceremony script or a related story.
  • For Juniors working on the Scribe badge, this activity satisfies Step 1 (Start with a Poem).
  • For Juniors working on the Drawing badge, this activity satisfies Step 1 (Experiment with Different Shading Materials). In fact, depending on what is drawn, girls could satisfy all the steps with this activity.
  • Plan some time for Blackout Poetry during a Self-Esteem Workshop. This activity offers girls a different avenue for expression, and it's another way to emphasize how special and unique each individual is.
I've presented several ways to introduce Blackout Poetry to the girls in your troop. I'm sure readers will come up with other applications. Please feel free to post your art in the comments section below. I'd love to see it!  Thank you for reading.

Saturday, June 4, 2016

Craft: Tie Dye Crayons


This spring, my daughter's third grade class held a Product Fair.  For several weeks leading up to the special day, students earned play money.  Each student created a product and designed a poster, hoping to entice fellow classmates to spend their hard-earned cash on his or her goods.  My daughter decided to make tie dye Lego crayons, using silicone Lego molds we had purchased from Amazon several years ago.  Here are the steps she followed (with parental supervision, of course):
  1. Choose the crayons to use.  My daughter used 2-3 crayons of each color.


2.  Place the crayons in a zippie bag.  She used a separate baggie for each color.  The wrappers fall off when the crayons are smashed with a hammer or a rolling pin.  This is much easier and less time consuming than peeling the wrappers from the crayons.
3.  Preheat the oven to 200 degrees.
4.  Place the silicone molds on a cookie sheet.
5.  Sprinkle the crayon crumbles into the molds as desired.
                          
6.  Slide the cookie sheet into the oven and bake until melted.  We checked the progress in five minute intervals, adding minutes as needed.  The Lego men finished in about twelve minutes, and the Lego bricks took about 20 minutes.

NOTE:  After removing the Lego men from the oven, my daughter noticed the finished product was not going to be as thick as she had expected.  She sprinkled more crayon crumbles on top of the melted wax before sliding the cookie sheet back into the oven for about five more minutes.
    

7.  Let the crayons cool before popping them from the molds.

NOTE:  If a tie dye crayon happens to fall on the floor and crack in all the excitement, place the pieces back in the mold and bake until melted.  Once the crayon cools, it will be as good as new.

My daughter paired a Lego man with a Lego brick and packaged them for the Product Fair in a 4x6" clear treat bag.  These Lego crayons were quite a hit!  She was really excited to be the first in her class to sell out at the Product Fair.

With such a variety of silicone molds available today, the options are endless.  Tie dye crayons make great birthday party favors.  Consider trying this craft on a rainy day, during a birthday party, or at your next Scout meeting. (Think about using a bug-shaped mold to make a bug craft for the Brownie Bugs badgeRemember these crayons as the girls experiment with different shading materials for the Juniors Drawing badge).  I would love to hear how this worked for you and the special kids in your life.  Thank you for reading.

Monday, December 14, 2015

Junior Girl Scouts badge: Drawing

This past August, my younger daughter attended an art camp at a local civic centerThe program was hosted by Young Rembrandts, a network of franchise business owners across the United States and around the world who teach children to draw.  Their preschool program is appropriate for children ages 3 ½ to 5, while the Elementary program is suitable for students 6 to 12 years old.  According to camp class descriptions, there are a variety of themes available.  Several examples include:  Animal Cartooning, Horses, Science Fiction, Superhero Cartooning, and Under the Sea. My daughter was registered for two classes, so she was at camp for a total of three hours a day for three consecutive days.  The classes were taught by the same instructor and were held in the same room.  There was a fifteen minute break between the classes.  Students learned to draw cartoons in the first class, and they practiced using pastels in the second class.  She absolutely loved it!


Knowing that our Junior Girl Scouts wanted to earn their Drawing badge this year, I looked beyond the Young Rembrandt summer camps and discovered we could set up a class on our own.  A minimum of 6 students is required to schedule your own class. The cost is $120 for a two-hour Scout program, and this covers up to 20 students.  CORRECTION:  The two-hour class is $12 per Girl Scout with a minimum of 10 girls and a maximum of 20 girls.  There is also a one-hour class option for $6 per Girl Scout.  Classes are often held at a school or community center, and the troop leader is responsible for finding the location.  We were able to reserve a room at the Civic Center free of charge since we are part of a nonprofit organization.  Young Rembrandts requested the room have a dry-erase board, and they provided all of the supplies needed for the program. This specific two-hour program has been designed to meet the Girl Scout badge requirements.  Young Rembrandts has six years worth of curriculum, so it is possible that the drawings could change from what is published in this postDuring the two-hour program, our girls did complete all five steps for the Drawing badge.

STEP 1:  Experiment with different shading materials.
The girls drew three drawings during our two-hour program.  One they left in pencil, one they outlined in Sharpie and colored with markers, and one they colored with colored pencils. 


STEP 2:  Learn how to add shading.
Our instructor gave the girls a quick coloring lesson.  She outlined an area on her drawing before shading the area in, moving in only one direction.  She demonstrated how to shade the area with a colored pencil.  She provided many tips throughout the class, but one was especially helpful--If you are going to use an orange marker, for example, color everything on the paper you want to be orange before you switch to a different color.  This is a great suggestion for a group of kids who are sharing the same resources.

STEP 3:  Get some perspective.

We had a discussion about drawing from different perspectives, and the girls practiced perspective while drawing a planet landscape.
 

STEP 4:  Use your imagination like a graphic artist.
The girls drew three cartoon aliens and had the opportunity to add details to make them their own.  
 
STEP 5:  Make your masterpiece--and show it off!
At the end of the program, the girls made a portfolio.  They folded half a piece of poster board in half and secured the two sides with patterned duct tape.  They punched a hole in the center of the top edge and tied a ribbon through the hole.  They used markers to decorate their portfolios.

I highly recommend booking a class with Young Rembrandts.  They were prompt when returning phone calls and answering emails.  They were flexible when we had to reschedule our original date.  The instructor kept the girls on task, and they were busy from the minute the class began to the minute it was time to leave.  Well worth every penny!  Since this was our only event for December, the girls had a cookie exchange at the end of the evening.  Our Brownies will earn the Family Story badge in January.  I hope you check back with us.  Happy Holidays!  Hope you all have a fun and safe New Year!

Wednesday, September 23, 2015

The Plan for 2015-2016

At the end of the 2014-2015 school year, the girls in our troop participated in Early Bird RegistrationI was really excited that all of our girls wanted to return for another year of Girl Scouts--our sixth year together!  We also welcomed two new girls into our blended troop, giving us six Juniors and five Brownies this year. 

As usual, we took a break from troop meetings and activities over the summer.  Three of the girls from our troop attended a Girl Scout Summer Resident Camp together.  Despite some strong storms, it sounds like they had a blast during their week at camp!

As families geared up for the return to school, I touched base with troop members.  I learned a lot had changed for some of our girls between June and August.  One family moved to a nearby town, another girl was losing interest in Girl Scouts, and many of the girls planned to participate in other extracurricular activities which placed a greater demand on their time.  Some changes needed to be made to retain our membership.  Instead of meeting twice a month as we have in the past, we are going to have one activity a month this year.  Most of these activities are going to be outings or events.  After sharing this new plan with the families, they all agreed to continue.  I'm so happy we will not be losing any of our girls this year.  

Here is a snapshot of our calendar:
  • Bake Sale at our school's Open House
  • S'mores Fest
  • Tour at Neusole Glassworks
  • Home Scientist and Inventor Badge programs for the Brownies at Drake Planetarium
  • Drawing Badge for the Juniors with Young Rembrandts
  • Family Story Badge and Art Show
  • Service Project:  Make cards and fill mason jars with candy and paper flowers for Veterans and their families at the Fisher House
  • Gardener Badge for Juniors at Civic Garden Center
  • Geology Program at the Cincinnati Nature Center
  • Service Project:  Plant garden at Fisher House
  • Bridging Ceremony 
My blog posts will consist of reviews of the programs and events we attend this year.  I think we're going to have a lot of fun!  Hope you check back with us soon.