Showing posts with label Girl Scouts. Show all posts

Wednesday, January 18, 2017

Thinking Day Thoughts


In November, our family went on a mission trip to Nicaragua.  Our team dug trenches and helped with the construction of a school in two different communities during our week there.  When we returned to the States, my daughters came across the book A Long Walk to Water: Based on a True Story by Linda Sue Park. This novel is written from the point of view of two 11-year-olds in Sudan. The book covers both history and geography and exposes readers to the harsh realities of life for people in other parts of the world.  It is a story of hope and perseverance, and the book provides a reason to discuss how to get involved and make a difference in this world.  Please note this book is written for readers ages 10 and up.  There are several sad and frightening sections that may upset younger readers. 

As in Nicaragua, access to clean water is a huge issue for many Sudanese communities.  Days are spent getting water to survive, yet the water is not safe to drink.  A Long Walk to Water struck a chord in our family, and it got me thinking...

World Thinking Day is February 22nd.  This year's global theme is Grow. While the intent is to invite other girls to join in the Girl Scout Movement, two goals for Thinking Day are:

    • Take action and speak out on issues we most care about
    • Make a difference by fundraising for projects around the world
    In Nicaragua, Amigos for Christ comes alongside community leaders to help improve the standard of living for people there. They also build into the spiritual lives of the people they meet.

    Water for South Sudan is the organization highlighted in A Long Walk to Water. As in Nicaragua, the villagers provide labor to drill the wells, and one well may serve thousands of people. With clean water, women and children don't have to
    spend their days walking for water. Kids can go to school, which promises a brighter future.  With a well, there are healthier pregnancies, and marketplaces can be supported.  "Where safe water flows, life can blossom." 


    As your girls consider their options for Thinking Day this year, I encourage you to introduce them to A Long Walk to Water.  Read the book on your own and modify the story for younger girls. Maybe they'll be moved to choose to learn more about Nicaragua or Sudan this February. "Where safe water flows, life can blossom. #LetsGrow" would look great on a poster!  Both organizations mentioned in this post offer a variety of ways to get involved and give. Water for South Sudan provides helpful tips on their website for organizing a fundraiser.

    While bumping around the WFSS website, I learned about the H2O Project:
    1. Make water your only beverage for 2 weeks.
    2. Save the money you would usually spend on beverages.
    3. After 2 weeks, donate the money you saved and give someone clean water for a lifetime.
    Just think of the money that could be raised by your family, Girl Scout troop, school, or Service Unit!  If your troop chooses such a challenge, I'd love to hear about it.  Thank you for reading.


    Friday, December 2, 2016

    Craft: Fingerprint Christmas Lights for Teachers, Coaches, and Scout Troop Leaders

    Looking for a fun and inexpensive holiday gift for teachers, coaches, and troop leaders this year?  I came across this canvas on Pinterest: a painted strand of Christmas lights spells out the word love, and fingerprints are the lights.  After brainstorming for several minutes, I decided this craft could easily be modified just by changing the word.

    For Teachers:  learn, teach, educate, instruct, cooperate, school, name of subject (example: reading, writing, science), name of the school, school mascot.
    *After listing these words off the top of my head, I discovered a website of vocabulary lists. I bumped around for a few minutes, finding lists for various subjects and areas of interests.

    For Coaches:  coach, teamwork, team, together, name of the sport (example: basketball), sport specific words (example: dribble), aggressive, defense, practice.  
    *Check out this website for additional sport-specific words.

    For Scout Troop Leaders:  leader, leadership, courage, confidence, character, Scouts, Girl Scouts, trefoil, promise, badges, level of Scouts (example: Brownies).  
    *This Girl Scouts vocabulary list provides additional ideas.

    I thought this Christmas canvas would be fun to do with my daughter's fourth grade class during their winter party as a gift for their teacher. Knowing there are 24 students in the class, I chose the word learn and purchased a canvas with adequate space (8"x16"). I found a three-pack at Hobby Lobby for $7.99. With the 40% off coupon, the canvas package cost around $5 ($1.67 each). I also picked up a 6"x6" stand for $4. I chose to use black, red, blue, yellow, and green paint, which I already had on hand. 

    As I painted the black string and sockets, I made a couple mistakes but decided to continue for practice. My daughters took turns placing their thumbprints on the canvas, and we alternated the colors of the lights along the way.  Here is the finished practice run in the stand:


    Take Two! Here is the prepared canvas the students will finish for their teacher in a couple weeks. They will use a Sharpie to sign their names on the back of the canvas.

    I'll be sure to update this post with a picture of the finished project.  I hope you enjoy this holiday season with family and friends.  Merry Christmas!

    Thursday, November 10, 2016

    Blackout Poetry

    Last month, my 11-year-old daughter and I attended Books by the Banks in Cincinnati. While she was preoccupied with alcohol-inked ceramic tiles and activities that taught her how to solder and create a paper circuit with copper tape and a LED diode, my eye was drawn to the Blackout Poetry station at the end of the table. For more details about the time we spent at this event, please visit this post I've published on my website.

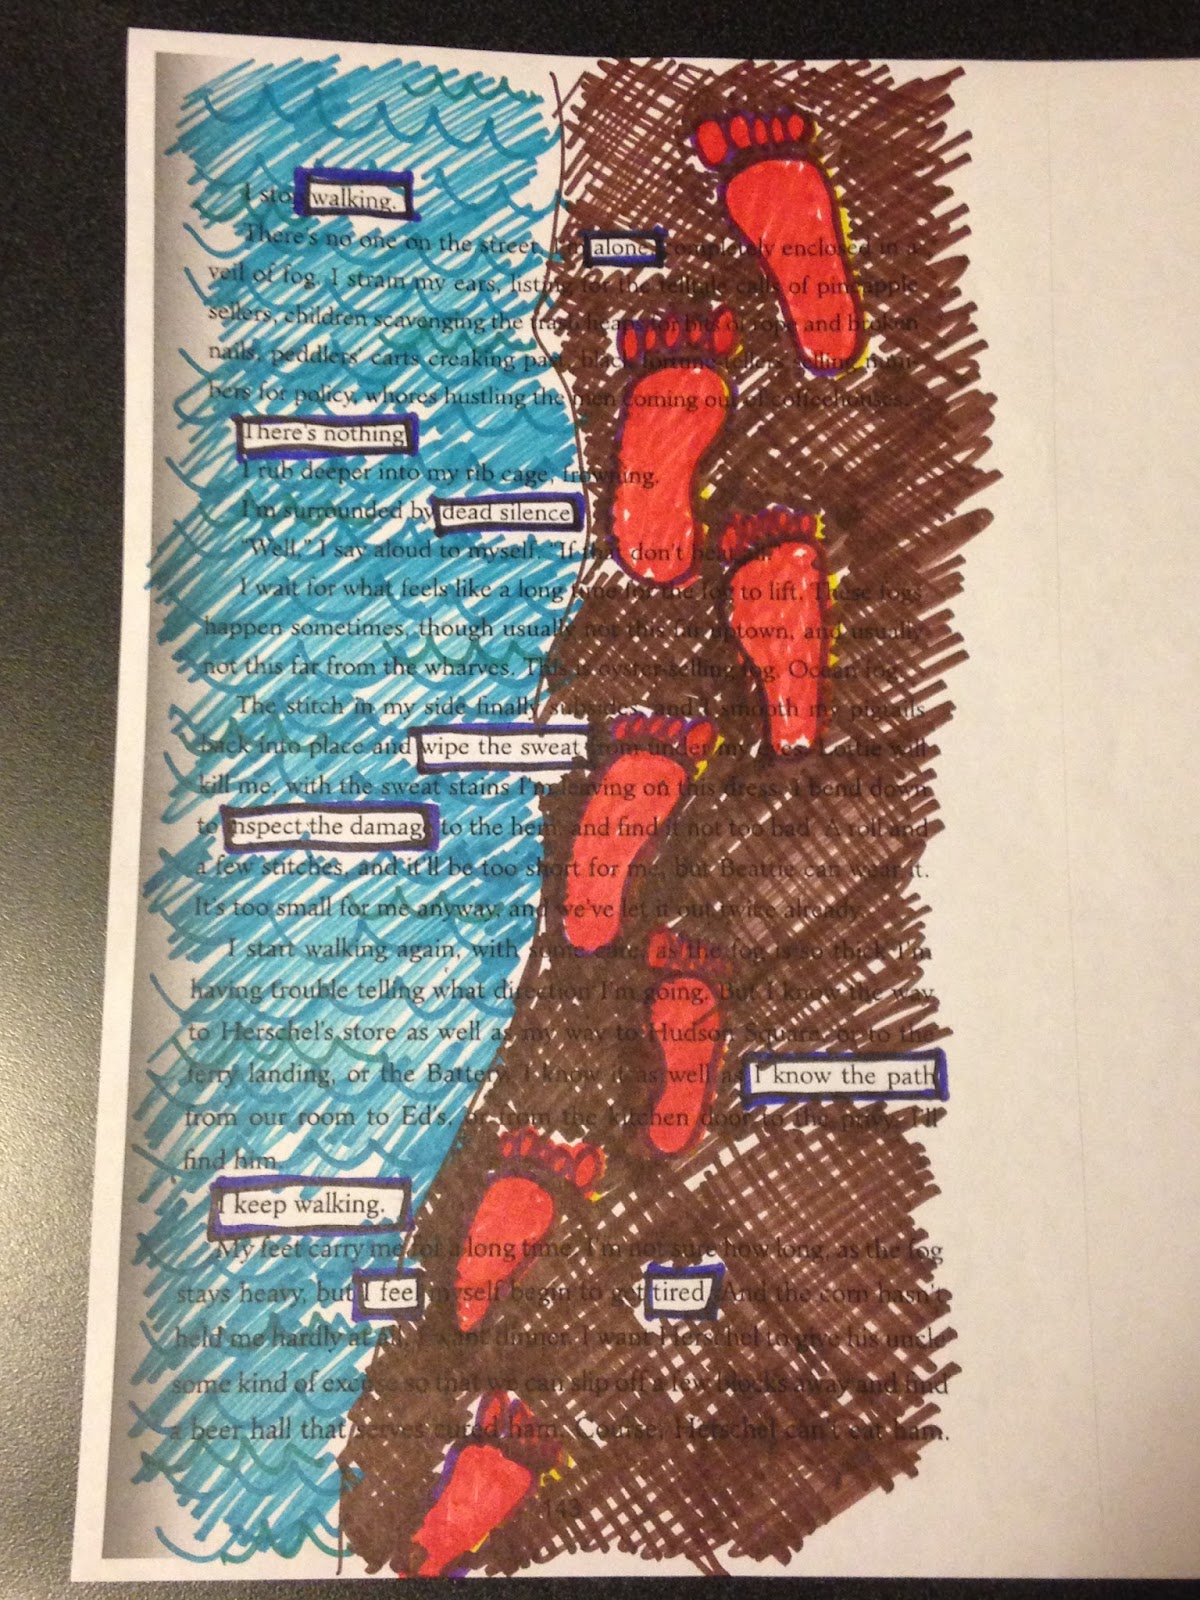
    A few days after the event, I decided I wanted to create my own example of Blackout Poetry for this post. I pulled out the pages provided at the event and read over the text, drawing boxes around words to form a poem.  I illustrated my poem with Sharpie markers. Instead of drawing footprints on a beach, I could have chosen to sketch a pattern or design.


    The words I chose to highlight read as follows:

    walking
    alone
    There’s nothing.
    dead silence
    wipe the sweat
    inspect the damage
    I know the path
    I keep walking.
    I feel…tired.

    Any sheet of paper with printed words will work for this activity–consider pages from a book, newspaper, or magazine. Try different mediums to achieve the desired effect–crayons, markers, colored pencils, or paint. With Blackout Poetry, the possibilities are endless.


    How can you incorporate this activity with your Girl Scout troop?
    • Provide supplies at the next troop holiday party. The printed pages can be related to the party theme.
    • Print pages about Juliette Gordon Low for a JGL or Girl Scout Birthday celebration.
    • Copy a page from The Brownie Story (The Girl's Guide to Girl Scouting or a related website).
    • Before or after your troop bridges, find a page from a ceremony script or a related story.
    • For Juniors working on the Scribe badge, this activity satisfies Step 1 (Start with a Poem).
    • For Juniors working on the Drawing badge, this activity satisfies Step 1 (Experiment with Different Shading Materials). In fact, depending on what is drawn, girls could satisfy all the steps with this activity.
    • Plan some time for Blackout Poetry during a Self-Esteem Workshop. This activity offers girls a different avenue for expression, and it's another way to emphasize how special and unique each individual is.
    I've presented several ways to introduce Blackout Poetry to the girls in your troop. I'm sure readers will come up with other applications. Please feel free to post your art in the comments section below. I'd love to see it!  Thank you for reading.

    Wednesday, November 9, 2016

    Alcohol-Inked Ceramic Tiles

    On October 15th, my 11-year-old daughter and I attended Books by the Banks in Cincinnati. This "day-long festival, which is free and open to the public, features national, regional, and local authors and illustrators; book signings; panel discussions; and activities for the entire family to enjoy."  And enjoy, we did! In this post, I will highlight alcohol-inked ceramic tiles, one of the many different activities offered at the event to readers who visited Teen Scene.


    Supplies:
    • Ceramic tiles--4"x4" or 4.5"x4.5".  These tiles are relatively inexpensive and can be picked up at home improvement stores.
    • Alcohol Ink.  I found 3-packs of Ranger Adirondack Alcohol Ink online for $10. I would look for the inks at a craft store where I could use coupon.
    • Rubbing Alcohol 
    • Tissues or cotton balls
    Procedure:
    • Use a tissue or cotton ball to wipe the tile with rubbing alcohol.
    • Apply drops of alcohol ink to the tile. 
    • Allow the ink to dry.  Other readers returned after about 10 to 15 minutes to retrieve their tiles. By this time, the ink had dried enough to transport the tiles home.
    NOTES:
    *When my daughter made her tile, she dripped a complimentary color of ink on top of another drop, which resulted in a cool blending of colors.  Beware though, too much ink will cause the colors to bleed into an unpleasant brown. 
    *While the price of the alcohol ink could pose a problem for the troop budget, keep in mind I was assured the ink goes a long way by the volunteer working this station.

    This would be a fun craft to do during a troop party or meeting. Maybe incorporate it into a Self-Esteem Workshop and celebrate each girl's unique qualities alongside the beautiful tiles. Or think outside the box and plan for your Brownies to create these tiles to satisfy Step 3 (Paint a Mood) and/or Step 4 (Paint without Brushes) for the Painting badge.

    I invite you to check back soon. In my next post, I will share another activity offered during the Books by the Banks event and explain how it can be incorporated in your next troop meeting. Thank you for reading.

    Thursday, June 30, 2016

    Camping Printables


    I'm writing inspirational fiction for middle grade readers (ages 8-12).  Though I am not yet published, I believe I'm making large strides toward this goal.  I invite you to check out the puzzles and games I created based on my current work in progress.  Since the Mad Lib and Would You Rather... worksheets are related to camping, I thought Girl Scouts and their leaders might find them to be entertaining.  Work on them while on a camping trip, or print them out to occupy the girls while you're waiting for parents to arrive at the end of a meeting.  However you choose to use them, I hope your girls enjoy!

    Saturday, June 4, 2016

    Craft: Tie Dye Crayons


    This spring, my daughter's third grade class held a Product Fair.  For several weeks leading up to the special day, students earned play money.  Each student created a product and designed a poster, hoping to entice fellow classmates to spend their hard-earned cash on his or her goods.  My daughter decided to make tie dye Lego crayons, using silicone Lego molds we had purchased from Amazon several years ago.  Here are the steps she followed (with parental supervision, of course):
    1. Choose the crayons to use.  My daughter used 2-3 crayons of each color.


    2.  Place the crayons in a zippie bag.  She used a separate baggie for each color.  The wrappers fall off when the crayons are smashed with a hammer or a rolling pin.  This is much easier and less time consuming than peeling the wrappers from the crayons.
    3.  Preheat the oven to 200 degrees.
    4.  Place the silicone molds on a cookie sheet.
    5.  Sprinkle the crayon crumbles into the molds as desired.
                              
    6.  Slide the cookie sheet into the oven and bake until melted.  We checked the progress in five minute intervals, adding minutes as needed.  The Lego men finished in about twelve minutes, and the Lego bricks took about 20 minutes.

    NOTE:  After removing the Lego men from the oven, my daughter noticed the finished product was not going to be as thick as she had expected.  She sprinkled more crayon crumbles on top of the melted wax before sliding the cookie sheet back into the oven for about five more minutes.
        

    7.  Let the crayons cool before popping them from the molds.

    NOTE:  If a tie dye crayon happens to fall on the floor and crack in all the excitement, place the pieces back in the mold and bake until melted.  Once the crayon cools, it will be as good as new.

    My daughter paired a Lego man with a Lego brick and packaged them for the Product Fair in a 4x6" clear treat bag.  These Lego crayons were quite a hit!  She was really excited to be the first in her class to sell out at the Product Fair.

    With such a variety of silicone molds available today, the options are endless.  Tie dye crayons make great birthday party favors.  Consider trying this craft on a rainy day, during a birthday party, or at your next Scout meeting. (Think about using a bug-shaped mold to make a bug craft for the Brownie Bugs badgeRemember these crayons as the girls experiment with different shading materials for the Juniors Drawing badge).  I would love to hear how this worked for you and the special kids in your life.  Thank you for reading.

    Monday, March 14, 2016

    Craft: Mini Canvas

    This winter I've been helping my husband coach our daughter's basketball team.  The season is winding down, and I wanted to give each of the girls a small token so they could remember their time with the team.  In this post, I will share how I personalized these cute mini canvases for the girls on the basketball team.  The total cost was less than $1.75 for each gift, including the gift bag.  Our Girl Scout Troop will be bridging this spring, so I've also been brainstorming gift ideas for them.  With a few modifications, you can personalize Bridging gifts without breaking the bank.  

    This four-pack of 3" mini canvases was found at Hobby Lobby for $4.99.  Using a 40% off coupon, the package can be purchased for $2.99 plus tax.

    I picked up the paint for $0.50 a bottle at Walmart.
    I also bought the Sharpies at Walmart, but they can be purchased at Dollar Tree as well.


    Paint the front and edges of the canvas your desired colorPurple and white are the colors of our basketball teamIt took three coats of paint to cover the canvas completely.


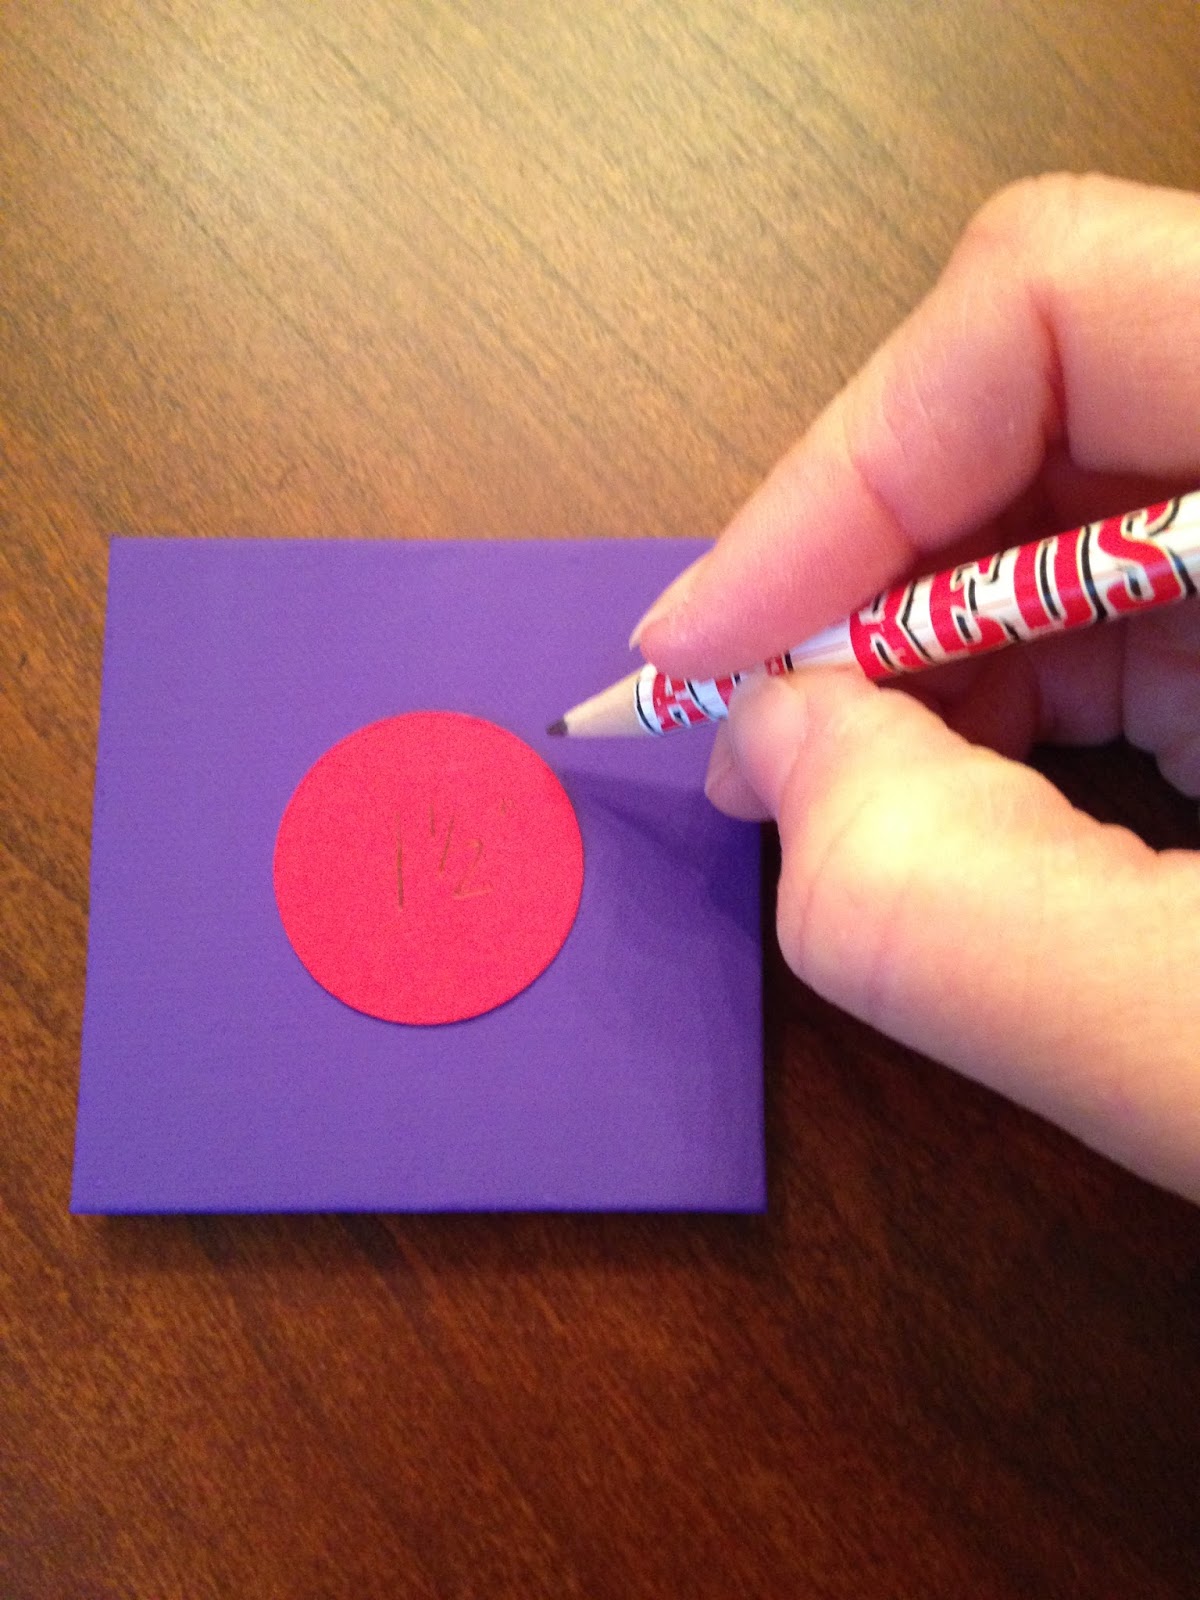
    Cut a 1.5 inch circle out of cardstock.

    Using this cardstock template, trace a basketball in the center of each canvas.


    It took six coats of orange paint to cover the circle for the basketball.

    Using a Sharpie, outline the circle and add lines on the basketball.  


    Write the player's name, number, and team name on the canvas.

    Of course, a thin paintbrush and black paint or a paint pen would work as wellI'm just partial to the permanent marker.


    Apply a thin coat of Mod Podge on the front and edges of the canvas and let it dry.

    Borrowing parachute cord that remained from our Girl Scout Troop's macrame bracelet project, I snipped three-inch segments of purple cord. 

    Using a glue gun, adhere the ends of the cord or ribbon in the center of the top edge of the canvas to make a loop.


    I decorated white gift bags I purchased at Dollar Tree (3 bags for $1) by cutting 2" orange circles out of cardstock.  I added lines to the basketballs and adhered them to the bags with a glue stick.  Each player's name was written on a bag beneath the basketball.  I used tissue paper and white curling ribbon I had on hand to finish the bag.  My husband will write a note to each player, and we'll stick the card in the bag before heading off to the Awards Ceremony.
     

    For Girl Scouts:
    • Cut out a trefoil template.  I found this trefoil on the cover of a Girl Scout Volunteer Opportunities booklet.  It was the perfect size for this mini canvas.    
    • Paint the trefoil green.  
    • Outline the trefoil with a black Sharpie.  
    • Add a girl's name and your troop number to the canvas.  Or write the words "Courage, Confidence, and Character."
    • Use a glue gun to adhere ribbon to the back of the canvas.
    • Place in a personalized gift bag.  I used this same template to cut trefoils out of green cardstock.  I glued the trefoils to the gift bags and added tissue paper and white curling ribbon as was done for the basketball gifts.

    Don't have an athlete or a Scout?  These mini canvases would make adorable birthday party favors.  I picture a personalized cupcake on a mini canvas for the guests.  I can see this working well for a beach-themed party:  flip flops, bucket, sand castle.  A zoo or farm-themed party:  faces of pigs, cows, and horses.  A tea party: tea cup, flower...the options here are endless!  Depending on the ages of the guests, it might be fun to have the kids paint a canvas during the party.

    Instead of making this gift for our Bridging Girl Scouts this year, I decided to melt crayons on a canvas for each of the girls in our troop.  I will share the process and the finished product in a future post.  I hope you check back soon!  Thank you for reading. 

    Tuesday, March 1, 2016

    Girl Scout Week and Founder's Day Fun


    My daughter's fifth grade reading class was assigned a historical fiction quilt project this quarter.  Impressed with this assignment, I immediately started brainstorming how this project could be modified for Girl Scouts and even for younger children not involved in Scouts.  Since my daughter was the one completing the work, I asked for her feedback.  After sharing ideas with each other, we thought it could be fun for troops to incorporate this project into a Founder's Day or Girl Scout Week celebration.  Girl Scout Week always includes the organization's birthday, March 12.  After modifying the assignment with Girl Scouts in mind, we came up with the following variations to the original project.

     
    1.  Girls of all ages can learn about Juliette Gordon Low, the Founder of Girl Scouts of the USA. 
    • Borrow a book about Juliette Gordon Low from the library or your Girl Scout Council.
    • Leaders prepare in advance or allow time for the girls to find facts about our Founder on different websites to share with the troop.
    • Girls in the troop can perform the Juliette Gordon Low Interactive Story like we did here.  
    2.   Specifically for Daisy Girl Scouts:
    • Girls in the troop can perform a the Juliette Gordon Low Interactive Story like we did here.  
    • Share the story of Juliette Gordon Low and her magnificent strand of pearls as we did during this meeting.
    • Before the meeting, divide the paper into nine equal sections. 
    • Instruct the girls to draw the following pictures Juliette Gordon Low as a young woman, Georgia (known as the Peach State), horses, London (British flag or Big Ben?), Boy Scouts, Girl Scouts, a strand of pearls, and the world.  The ninth square could be reserved for each girl to draw what Girl Scouts means to her.  
    • The girls can write on their squares, but it's unnecessary if they can remember the story based on the pictures they have drawn.
    3.  Specifically for Brownies:
    • See #1 and #2 above.
    • Have the girls take turns reading The Brownie Story.  A version of the story is included in the Brownie Girl's Guide to Girl Scouts, but there are several creative skits and ceremonies that revolve around this story that can be found online. They could make their quilt squares by following the writing and coloring instructions in the photo posted above. 

    4.  Older Girl Scouts may wish to learn about influential women who were once Girl Scouts.  
    • A quick online search reveals comprehensive lists of names from which to choose.  
    • Each girl selects eight or nine women to learn more about.
    • Collect a couple facts about each person.
    • Divide the paper into nine equal sections.  Write about and color one section for each of the women.
    • That ninth square could be reserved for her to draw and write about what Girl Scouts means to her.
    5.  For large troops or when there's not enough time to complete this entire project during a meeting:
    • Have the girls work in groups.  
    • Each group selects nine influential women who were once Girl Scouts.  
    • The girls choose facts about those women for the quilt squares.  
    • Give each girl squares that were cut to the desired size prior to the meeting.
    • Each girl completes the square(s), depending on the number of girls in the group.  
    • Tape the squares together.
    • Share the quilts with the rest of the troop.
    6.  Not in Scouts?  My daughters love to read.  They often like to write stories and draw pictures.  If you know kids like mine, this could be a great way to entertain them on a day when they claim there's nothing to do. 
    • The Who Was series of books by various authors are geared toward readers ages 8 to 12 (grades 3 to 7).  Who Was Anne Frank? is a great example.  These books are around 100 pages long, so it may not take them too long to finish reading before they can get to work on the quilt.
    • Brad Meltzer's Ordinary People Change the World is an adorable series geared toward readers ages 5 to 8 (grades K to 3).  Like I am Amelia Earhart, these books are around 40 pages longI think older kids would even enjoy Meltzer's stories and the illustrations by Christopher Eliopoulos.  I know I did!    
    With help, a preschooler could work on this project to feature his or her favorite books.  Preserving a preschooler's work in a picture frame will be treasured for years to come. 
    • Have the child choose his or her favorite books. 
    • Using a Sharpie and a ruler, divide a 12"x12" sheet of white cardstock into nine 4"x4" squares or four 6"x6" squares.
    • Read one of the books together.
    • An adult records the title of the book and what the child reports as his or her favorite part of the story.
    • The child draws or colors on the square on his or her own, or an adult can draw a picture for the child to color.  
    • Over time, the squares will be completed. 
    • Display this art in a 12"x12" frame.
    While this began as a language arts project in a traditional classroom, I have shared ways to modify the project for Girl Scouts, kids who love to read, and kids who may need a little encouragement to read more frequently.  If you try this project with the children in your life, I would love to see the finished quilts!  Thank you for reading.