From Seed to Sprout
For the past couple of years, my daughters have helped my husband with a garden in our backyard. They begin in early spring by planting seeds in peat pellets that are placed in a covered tray. The tray is set on a heating pad and covered with a thick blanket to provide a dark, moist environment. The girls use their resources wisely and label the pellets with old address labels. One end of the label is wrapped around a toothpick before being inserted into the dirt.
A few days later, sprouts will appear.
The pellets are transferred to a modified greenhouse.
Supplies for the modified greenhouse:
standard 10' piece of 3/4" PVC pipe cut to size as follows:
1 piece (4.5 feet) for the crossbar
2 pieces (18 inches) for the legs
4 pieces (8 inches) for the feet
2 PVC elbow joints
2 PVC Ts
Fluorescent Shoplight
(chains and s-hook come with the shop light)
foil
duct tape
Steps:
- Construct your greenhouse PVC frame.
- Cut two 4.5' sheets of foil and lay on ground.
- Tape bottom and side edges of foil with duct tape to reinforce.
- Hang shop light from top of PVC frame using chains
- Tape foil sheets to edge of shop light.
As the sprouts continue to grow, they will need to be transferred to larger pots, most likely more than once, before being planted in the ground.
As long as the plants receive an adequate amount of sun and water in your garden, you will enjoy a bountiful harvest. Just watch out for those woodland creatures who always seem to get to those tasty veggies first!
Hanging Gardens
I happened to be watching an older episode of Kelsey's Essentials when Kelsey Nixon visited Rockaway Taco to speak with Andrew Day Field about his unique approach to tacos. In preparation for this post, I read that this taco stand has closed, but I wanted to share how Andrew was able to grow vegetables and herbs in a small space. Unfortunately I was unable to find a video of this episode online, but you can view other episodes of her show here. On a bright note, I did come across this picture which shows the hanging garden of various planters that caught my eye during Kelsey's visit to Rockaway Taco.
Steps to make your own hanging garden:
1. Punch holes in the bottom of the container to allow excess water to drain.
2. Cut an opening in the side of the container near the top.
3. Fill the container with soil.
4. Insert the plant and add more soil as needed.
5. Create a loop with twine and secure on handle of container.
6. Hang on fence or deck.
7. Enjoy!
Not only could these ideas help satisfy Scout badge steps, they could spark ideas for a future service project. For example, a hanging garden could be appreciated at a retirement or nursing home. Additionally, it's a great way to reduce, reuse, and recycle those plastic containers. Whether you are planting for someone else or for your own enjoyment, I wish you great success as you exercise your green thumb. Thanks for reading!
Last spring, our troop attended a Junior Girl Scouts Flower badge program and a Brownie Bugs badge program offered by the Civic Garden Center of Greater Cincinnati. Time was split between the classroom and the field, and our girls enjoyed the experience. When I learned about the Junior Girl Scouts Gardener badge program, I immediately placed a call to register. Our Juniors officially earned the badge while the Brownies enjoyed the fun event. We used
troop funds to cover the cost of the program ($5/girl). In this post, I
will describe how the girls completed the five steps to earn this Junior Girl Scouts Gardener
badge.
STEP 1: Visit a garden.
The Civic Garden Center of Greater Cincinnati has beautiful outdoor gardens. Unfortunately the weather didn't cooperate, so we spent the majority of our two hours together in the classroom. The rain stopped long enough for us to take a quick hike to the rooftop, herb, and dwarf conifer gardens located throughout the park.
STEP 2: Explore garden design.
Another Junior Girl Scout troop had also registered for this program. The girls divided into teams of three and used a variety of books to research different garden designs. They were instructed to find five facts about their garden design that they later presented to the rest of the group. We learned about zen gardens, indoor gardens, butterfly gardens, and a garden designed to attract birds.
STEP 3: Learn how to choose garden plants.
The girls were given unnamed seasonal growth charts for California (pictured on the left), Alaska (in the middle), and Ohio (pictured on the right). They worked in their teams of three to match each growth chart to its state. Then they chose one state and a month and developed a menu using ingredients that were in season.
STEP 4: Experiment with seeds.
Each Girl Scout was asked to choose four different vegetables to plant in paper pots. They were instructed to fill the pot with potting soil before dropping two seeds in the pot. Then they covered the seeds with another pinch of dirt. The instructor explained that the seeds should be placed at a depth about two times the width of the seeds. Since many of the seeds were really tiny, they needed to be situated near the surface and not buried too deep where they could not get adequate sunlight. These paper pots will eventually be planted in gardens throughout the park--another service project!
STEP 5: Grow your own garden.
The girls were shown how to make their own paper pots out of old paper. They learned to use a PotMaker, but we were told a water bottle and a table works as well.
Fold the paper in half lengthwise.
Line the fold with the top edge of the PotMaker.
Roll the paper tightly like a sleeping bag.
Fold the bottom edges in.
Press down and twist on the base of the PotMaker.
Voila! "An easier, economical and Earth-friendly way to grow plants."
After reusing paper to make some pots, the girls planted seeds to take home.
At Open House this summer, our troop held a Bake Sale. Our troop will use that money to plant flowers in garden boxes later this spring for Veterans and their families staying at the Fisher House in Cincinnati. This is another great way to complete a badge step while performing a service project!
In my next post, I will share two fun ways to start a garden at home. I hope you'll check back soon. Thank you for reading.
This winter I've been helping my husband coach our daughter's basketball team. The season is winding down, and I wanted to give each of the girls a small token so they could remember their time with the team. In this post, I will share how I personalized these cute mini canvases for the girls on the basketball team. The total cost was less than $1.75 for each gift, including the gift bag. Our Girl Scout Troop will be bridging this spring, so I've also been brainstorming gift ideas for them. With a few modifications, you can personalize Bridging gifts without breaking the bank.
This four-pack of 3" mini canvases was found at Hobby Lobby for $4.99. Using a 40% off coupon, the package can be purchased for $2.99 plus tax.
I picked up the paint for $0.50 a bottle at Walmart.
I also bought the Sharpies at Walmart, but they can be purchased at Dollar Tree as well.
Paint the front and edges of the canvas your desired color. Purple and white are the colors of our basketball team. It took three coats of paint to cover the canvas completely.
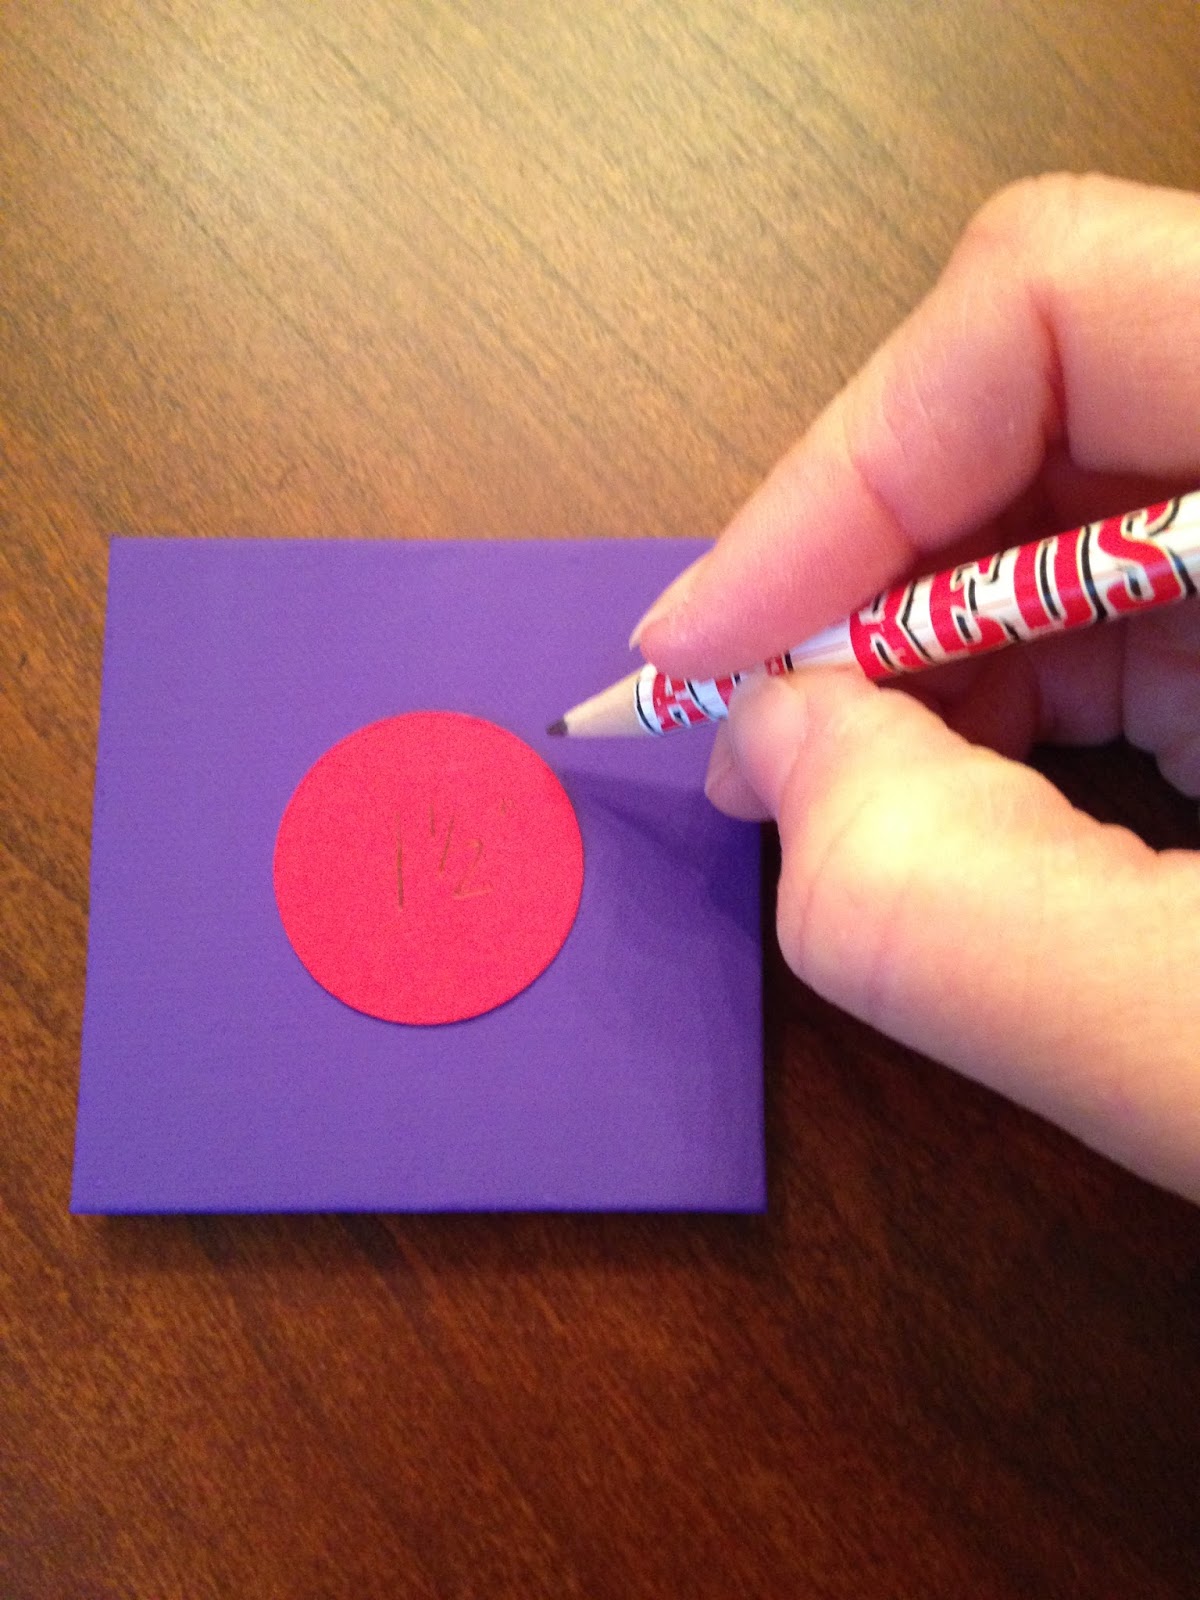
Cut a 1.5 inch circle out of cardstock.
Using this cardstock template, trace a basketball in the center of each canvas.
It took six coats of orange paint to cover the circle for the basketball.
Using a Sharpie, outline the circle and add lines on the basketball.
Write the player's name, number, and team name on the canvas.
Of course, a thin paintbrush and black paint or a paint pen would work as well. I'm just partial to the permanent marker.
Apply a thin coat of Mod Podge on the front and edges of the canvas and let it dry.
Borrowing parachute cord that remained from our Girl Scout Troop's macrame bracelet project, I snipped three-inch segments of purple cord.
Using a glue gun, adhere the ends of the cord or ribbon in the center of the top edge of the canvas to make a loop.
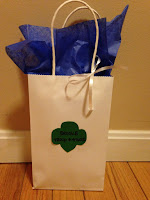
I decorated white gift bags I purchased at Dollar Tree (3 bags for $1) by cutting 2" orange circles out of cardstock. I added lines to the basketballs and adhered them to the bags with a glue stick. Each player's name was written on a bag beneath the basketball. I used tissue paper and white curling ribbon I had on hand to finish the bag. My husband will write a note to each player, and we'll stick the card in the bag before heading off to the Awards Ceremony.
For Girl Scouts:
- Cut out a trefoil template. I found this trefoil on the cover of a Girl Scout Volunteer Opportunities booklet. It was the perfect size for this mini canvas.
- Paint the trefoil green.
- Outline the trefoil with a black Sharpie.
- Add a girl's name and your troop number to the canvas. Or write the words "Courage, Confidence, and Character."
- Use a glue gun to adhere ribbon to the back of the canvas.
- Place in a personalized gift bag. I used this same template to cut trefoils out of green cardstock. I glued the trefoils to the gift bags and added tissue paper and white curling ribbon as was done for the basketball gifts.

Don't have an athlete or a Scout? These mini canvases would make adorable birthday party favors. I picture a personalized cupcake on a mini canvas for the guests. I can see this working well for a beach-themed party: flip flops, bucket, sand castle. A zoo or farm-themed party: faces of pigs, cows, and horses. A tea party: tea cup, flower...the options here are endless! Depending on the ages of the guests, it might be fun to have the kids paint a canvas during the party.
Instead of making this gift for our Bridging Girl Scouts this year, I decided to melt crayons on a canvas for each of the girls in our troop. I will share the process and the finished product in a future post. I hope you check back soon! Thank you for reading.
My daughter's fifth grade reading class was assigned a historical fiction quilt project this quarter. Impressed with this assignment, I immediately started brainstorming how this project could be modified for Girl Scouts and even for younger children not involved in Scouts. Since my daughter was the one completing the work, I asked for her feedback. After sharing ideas with each other, we thought it could be fun for troops to incorporate this project into a Founder's Day or Girl Scout Week celebration. Girl Scout Week always includes the organization's birthday, March 12. After modifying the assignment with Girl Scouts in mind, we came up with the following variations to the original project.
 1. Girls of all ages can learn about Juliette Gordon Low, the Founder of Girl Scouts of the USA.
- Borrow a book about Juliette Gordon Low from the library or your Girl Scout Council.
- Leaders prepare in advance or allow time for the girls to find facts about our Founder on different websites to share with the troop.
- Girls in the troop can perform the Juliette Gordon Low Interactive Story like we did here.
2. Specifically for Daisy Girl Scouts:
- Girls in the troop can perform a the Juliette Gordon Low Interactive Story like we did here.
- Share the story of Juliette Gordon Low and her magnificent strand of pearls as we did during this meeting.
- Before the meeting, divide the paper into nine equal sections.
- Instruct the girls to draw the following pictures: Juliette Gordon Low as a young woman, Georgia (known as the Peach State), horses, London (British flag or Big Ben?), Boy Scouts, Girl Scouts, a strand of pearls, and the world. The ninth square could be reserved for each girl to draw what Girl Scouts means to her.
- The girls can write on their squares, but it's unnecessary if they can remember the story based on the pictures they have drawn.
3. Specifically for Brownies:
- See #1 and #2 above.
- Have the girls take turns reading The Brownie Story. A version of the story is included in the Brownie Girl's Guide to Girl Scouts, but there are several creative skits and ceremonies that revolve around this story that can be found online. They could make their quilt squares by following the writing and coloring instructions in the photo posted above.
4. Older Girl Scouts may wish to learn about influential women who were once Girl Scouts.
- A quick online search reveals comprehensive lists of names from which to choose.
- Each girl selects eight or nine women to learn more about.
- Collect a couple facts about each person.
- Divide the paper into nine equal sections. Write about and color one section for each of the women.
- That ninth square could be reserved for her to draw and write about what Girl Scouts means to her.
5. For large troops or when there's not enough time to complete this entire project during a meeting:
- Have the girls work in groups.
- Each group selects nine influential women who were once Girl Scouts.
- The girls choose facts about those women for the quilt squares.
- Give each girl squares that were cut to the desired size prior to the meeting.
- Each girl completes the square(s), depending on the number of girls in the group.
- Tape the squares together.
- Share the quilts with the rest of the troop.
6. Not in Scouts? My daughters love to read. They often like to write stories and draw pictures. If you know kids like mine, this could be a great way to entertain them on a day when they claim there's nothing to do.
- The Who Was series of books by various authors are geared toward readers ages 8 to 12 (grades 3 to 7). Who Was Anne Frank? is a great example. These books are around 100 pages long, so it may not take them too long to finish reading before they can get to work on the quilt.
- Brad Meltzer's Ordinary People Change the World is an adorable series geared toward readers ages 5 to 8 (grades K to 3). Like I am Amelia Earhart, these books are around 40 pages long. I think older kids would even enjoy Meltzer's stories and the illustrations by Christopher Eliopoulos. I know I did!
With help, a preschooler could work on this project to feature his or her favorite books. Preserving a preschooler's work in a picture frame will be treasured for years to come.
- Have the child choose his or her favorite books.
- Using a Sharpie and a ruler, divide a 12"x12" sheet of white cardstock into nine 4"x4" squares or four 6"x6" squares.
- Read one of the books together.
- An adult records the title of the book and what the child reports as his or her favorite part of the story.
- The child draws or colors on the square on his or her own, or an adult can draw a picture for the child to color.
- Over time, the squares will be completed.
- Display this art in a 12"x12" frame.
While this began as a language arts project in a traditional classroom, I have shared ways to modify the project for Girl Scouts, kids who love to read, and kids who may need a little encouragement to read more frequently. If you try this project with the children in your life, I would love to see the finished quilts! Thank you for reading.